The Payment step of the order process is where staff choose how to pay for the products in the cart, submit the cart, or issue a refund for an already submitted order.
Pay
Purchase Order
You can click Submit Without Payment to accept full or partial payment using a purchase order or invoice.
On the Confirm your PO / invoice information dialog box, staff can re-enter information for a purchase order and invoice which are stored on the order.
If the payment is related to a purchase order, in Purchase Order Number, enter the purchase order number.
If an invoice is needed, in Invoice Description, enter a description of what is contained in the invoice.
Invoice Date is pre-populated with today's date, and you can update it if the invoice should be dated in the future.
Invoice Term is prepopulated with 30 days, and you can update the number of days after the Invoice Date the invoice should be due.
If you would like anyone other than the "bill to" for the order to receive the invoice email, in Invoice Email, enter another email address.
Click Submit Order.
One-Time Immediate Payment
You can click Pay to make a one-time payment for the individually selected cart items.
On the Payment Details dialog box, staff can receive payments of different forms for the selected entity.
You can then input the eCheck details as a stored payment type on the Order page.
Selecting Cart Items for Payment
You can review the list of all cart items a choose to which they would like to apply a one-time payment. By default, all order items in the cart are preselected. Staff can deselect a cart item(s) to avoid applying payment for it.
You can apply payment for the deselected cart item(s) later by editing the order after submission.
Payment Step Page in Internationalization
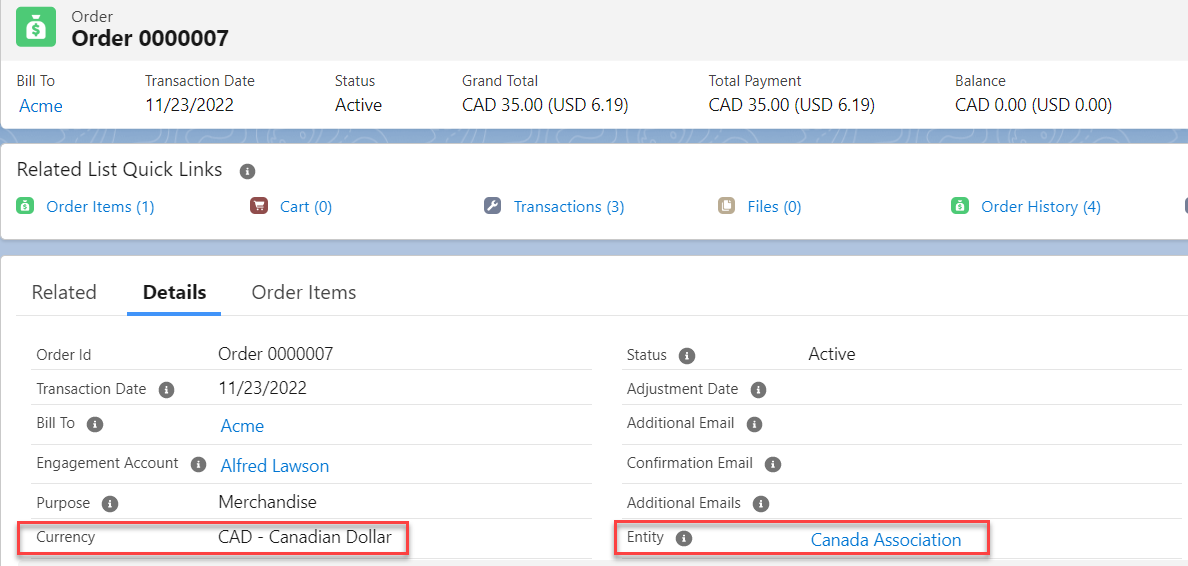
If you have enabled Salesforce multi-currency, you will start viewing the amount in theCurrency ISO Codeon alllayouts within your org.
The ISO Code that you view on the Payment Step page will match the Currency field value on the Entity that you have selected.
If the logged-in staff user's Currency field value does not match the Currency field value of the Entity record that he is placing an order on, you will also see the approximations displayed within the braces.
Payment Entity
If your association does not use entity crossovers, the payment is made to the entity of the selected batch and only payment methods, credit cards and stored payment methods for the selected entity display.
If your association uses entity crossovers, in Payment Entity, select the entity to which the payment should be made and for which payment methods, credit cards and stored payment methods for the selected entity display; the entity of the selected batch is preselected by default.
Payment Methods
Payment Amount is prepopulated with the full cost of the selected cart items and can be manually updated to make a partial payment.
In Payment Method, select one of the entity payment methods for the entity:
To receive payment in cash, select Cash and ensure Payment Amount is correct.
To handle payment with a paper check you plan to deposit later, select Check and in Check Number, enter the check number which is saved on the payment.
To receive payment with a one-time credit/debit card payment, select Credit Card and in Number, Expires, CSC, and Cardholder Name, enter the information on the card. The billing address is prepopulated with the Billing Address on the constituent's account, but Street, City, State, Postal Code, and Country can update if needed.
If your association uses Hosted Payment Forms, you will enter the Credit Card Number, Expires, CSC, and Cardholder Name on the Payment Form of the Hosted Payment Gateway instead of Nimble AMS or Community Hub.
Point of Sale
Card Not Inserted Correctly
If the card is not inserted correctly in the device or there is some issue with the device, an error informing the same will be displayed to the staff user. The staff user must cancel out and click the reader button again to retry.
If your association is using Point of Sale and it is enabled for you, on selecting Credit Card (Hosted) you will be taken to a hosted payment form with a Reader button. Perform the following steps make a card payment.
Connect the IDTech Augusta device and click Reader.
When a message to Swipe or insert card will be displayed and the device indicator displays a blue light, insert the credit/debit card in the device to read card details.
If you don't insert the card correctly, the device indicator will display a red light. You can then try reinserting it with chip facing the opposite direction.
If you don't reinsert the card, after few seconds, a blinking green light will display showing that the device is now in swipe mode, and you can swipe your card instead.
After the card information populates in encrypted format, click Submit to pay.
For the orders in which payment is made by point of sale, BluePay/CardPointe recieves encrypted card details. Also, on Nimble AMS, the Point of Sale Device checkbox is selected on the related Payment record.
Failed Transaction
In case the transaction fails due to lack of funds in constituent's account or any other technical issues, an error will be displayed informing the same and a link will be displayed to retry payment.
If your association uses Level 2 or Level 2 and Level 3 credit card processing, the Additional Processing Health section displays. The Additional Processing Health section displays that the payment is in good health if all necessary and optional information is populated for your association's selected credit card processing level—Level 2 or Level 2 and Level 3. If any information is missing, the Additional Processing Health section displays each missing piece of information.
To receive payment as a credit refund, select the name of the credit refund and ensure Payment Amount is correct. Learn more about Prepayments.
If your association uses stored credit cards or eCheck, to receive payment using a stored payment method, select Stored Payment and in Stored Payment Method, select the stored payment method from the payment gateway of the selected entity to use for payment. Only stored payment methods for the selected entity display.
If your association uses Level 2 or Level 2 and Level 3 credit card processing, the Additional Processing Health section displays. The Additional Processing Health section displays that the payment is in good health if all necessary and optional information is populated for your association's selected credit card processing level—Level 2 or Level 2 and Level 3. If any information is missing, the Additional Processing Health section displays each missing piece of information.
A message displays if the account has no stored payment methods. Learn how to Create a Stored Payment Method for the account.
If your association uses eCheck, you may find you cannot select a given bank account and that it is marked as Exceeds Maximum. This is because the payment amount exceeds your associations per-transaction limit which is determined by your payment gateway. To select the bank account, in Payment Amount, enter amount less then or equal to your association's per-transaction limit.
When selecting bank account, keep in mind, regulations specify that you must have customer authorization prior to processing a payment using an eCheck stored payment method. If you have received authorization, select Authorization Received to proceed.
Keep in mind, unlike credit card payments, eCheck payments are not instantly authorized. Like a paper check, the authorization process can take 5 to 7 days.
In Note, feel free to add any important information to be saved on the payment.
Click Save.
One-Time Scheduled or Installment Payment
You can click Schedule Payment to schedule payment for all cart items.
On the Schedule Payment dialog box, staff can schedule a one-time payment or multiple installment payments. The schedules can start on the very next day.
Scheduling a One-time Payment
Staff can schedule a one-time payment to be made in the future by selecting One-time in Pay. They can then select the stored payment method to charge, the amount, and the date of the payment. Staff can schedule multiple one-time payments by scheduling a payment, clicking Save, and clicking Schedule Payment again to schedule additional payments. Alternatively, Staff can use installment payments.
Scheduling Installment Payments
Staff can pay with multiple scheduled installment payments by selecting In Installments in Pay. They can then select the start date of the installment payments and the frequency. The occurrence of the scheduled payments is preselected, but staff can modify the occurrence to either schedule a different number of payments or schedule payments until a given date.
As staff make their selection, the section in the low left corner of the dialog box displays the scheduled installment payments that will be created.
Recurring Payment
Once you've submitted the cart as an order, you can enable recurring for eligible products.
To enable recurring, you must submit the cart as an order; not pro forma. See the Submit section for more on that.
On the newly created order, in the Order Items related list, click the order item with the related product(s) you want to recur.
On the order item, in the Recurring section, select Recurring, select how you want to pay, and click Recur Order Item.
Now, eligible product(s) in the order item will recur.
Recurring Schedule Start Logic
Under the Order Item Line, Recurrence Options you can add a picklist that allows you to recur further schedules based on a) the transaction date of the Order Item, or b) the start date of the previous recurring schedule.
Transaction Date - Further recurring schedules will have their start date based on the transaction date of the order item.
Start Date - The recurring schedule is created as usual. But any further recurring schedules manually created through the job (from anonymous apex) will have their start dates set according to the first recurring schedule's start date, andnotthe transaction date of the order item (as is currently the case).
Modify Payment
After a one-time payment is made, or payment is scheduled, you may want to adjust or remove the payment to correct a mistake, or to issue a full or partial refund.
Cash and Paper Checks
For a cash or paper check payment, in the Payments section, you can click Edit to change the details of the payment and Del to remove it completely.
Keep in mind this deletes the prepayment record.
One-Time Credit Cards and Stored Credit Cards
For a credit/debit card or stored credit card payment, you can void the payment, since it takes up to 24 hours to settle in the payment gateway. You can click Void to issue a void for the entire amount, which deletes the charge from a constituent's account in the payment gateway.
Scheduled Payments
In the Scheduled Payments section, you can add, modify or delete individual scheduled payments from the payment schedule.
Add a Payment
You can click Add a Scheduled Payment to add an individual payment to the payment schedule. You can manually modify the new scheduled payment and existing scheduled payments to customize the installments.
Modify a Payment
There are different ways you can modify an individual scheduled payment:
Click the date of the payment or the amount to modify them directly.
Click | Delete to cancel the scheduled payment.
Click | Edit to select a different stored payment method.
Apply Changes
After adding or modifying an individual scheduled payment, click Save to apply your changes or Cancel to revert them.
The schedule and schedule line(s) are retained after cancellation, but we recommend you make a note on the schedule detailing why the cancellation was made.
Submit
At this point in the process, you can submit the cart you have put together, which converts the cart into an order that you can view and edit in the future.
Submitting a cart varies slightly, depending on the type of payment:
If you are paying with a purchase order or invoice, click Submit Without Payment, enter details into the Confirm your PO / invoice information dialog box, and submit the cart and create transactions.
If you have applied a one-time payment, click Submit Order to submit the cart and create transactions.
If you are paying for an order with Hosted Payment Forms, click Submit Payment to submit the cart and create transactions.
If you scheduled payment, click Save as Pro Forma to save the cart and create transactions when the first scheduled payment is made.
Save as Pro Forma Button
This button will render only when:
There is no payment on the cart.
The cart is not an adjustment.
If you scheduled payment, click Submit as An Order to submit the cart and create transactions.
Advanced Taxation | External Tax ID
After submitting the order, if External Sales Tax is enabled, a transaction is generated on Avalara (External Tax System) and Document ID of that is stored in Nimble AMS as External Tax ID, which is displayed on order.
If required, you can use this ID to verify details in case of reconciliation or adjustment changes in order done by Nimble AMS. In case of cancellation or editing the order, Nimble AMS will use external Tax ID to update on Avalara portal.
The Cart's Wild Ride
When you submit a cart a number of different events occur in the background to fully transition to an order.
Note
If you have enabled Salesforce multi-currency, Salesforce introduces the Currency field on all object layouts within your org.
While a new Order, Order Item, Order Item Line, Payment and Payment Lines, and Transactions records get created, the Currency field value on these records gets populated based on the Currency field value of the Entity that these records are linked with.
Also, once the record is saved, you will not be allowed to edit the value of the Currency field.
Show Me An Image
Checking for a Conflicting Order Adjustment
By default, Nimble AMS allows multiple users to edit the same cart item. This is not recommended as orders could be impacted in unforeseen ways if multiple edits are made to an order at the same time.
When order adjustment versioning is enabled, Nimble AMS does not submit an order with a conflicting edit and displays a message letting staff know they cannot submit the order because it includes items which have been modified by another user.
Checking Inventory Availability
If a products(s) in the cart has inventory tracking enabled, a check is done to see if inventory has decreased to the point that there is an insufficient quantity to be purchased. If there is insufficient inventory, a message displays letting staff know what products(s) lacks inventory and they must go back to the Add Items step and adjust their selection.
Initiating an Inventory Update
An inventory record is created for any order item line containing a product with inventory tracking enabled. The inventory record contains the quantity purchased of the related products. Also, an update to the products inventory levels is scheduled to occur within five minutes after submission.
Initiating Membership Flow Down
If the order contains a company membership, Nimble AMS flows that membership down to all affiliated child accounts of the company account for which the membership was ordered.
If your association uses asynchronous membership flow down, and you are processing a membership order for a company account that has many child affiliations, the new membership might take a bit of time to flow down to all child accounts. You will receive an email when the updates complete. If you're not sure if your association uses asynchronous membership flow down, get your administrator some ☕ and have a chat about how it works for you.
Refund
When editing an order that's been submitted you might edit the cart item in the cart or are cancel the cart item entirely—creating a positive balance. In this case, you may want to issue a partial or full refund for one or more payments on the order.
Click Refund, Pay / Refund, or Pay, depending on if the balance on the order was paid fully, partially, or not at all.
In Payment Method, select one of the entity payment methods for the entity:
To refund in cash, select Cash and ensure Payment Amount is a negative number.
To refund in cash with a paper check you plan to issue, select Check, ensure Payment Amount is a negative number, and in Check Number, enter the check number.
To refund with a one time credit/debit card payment, select Credit Card and in Credit Card select the credit card payment you'd like to refund. For orders with multiple payments, you can view the details for each so you can select the one you want to refund. Refund Amount is prepopulated with the paid amount on the order and can be manually updated as a negative number to make a partial payment.
You can only issue partial refunds for payments after they have settled in the payment gateway which happens typically within 24 hours after payment. If the payment hasn't settled in the gateway, you can only issue a full refund by voiding the payment or use a manual credit card payment in the amount of the partial refund.
BluePay supports refunds to eCheck payments during the order process
For Authorize.net, refunds must be processed separately in the payment gateway. Also, when using Authorize.net for refund after 120 days, you must select the manual checkbox, re-enter the credit card information and process the refund as a new payment that has a negative amount. When using BluePay/CardPointe, select the manual checkbox only when refund is required on a different card or if partial refund is to be done.
If the payment hasn't yet settled in the payment gateway, or if the payment can no longer be refunded, you can make a manual payment to the credit card in the amount you'd like to refund. Select Manual and in Number and Expires enter the information on the card.
Number is prepopulated with the last 4 digits of the credit card used to make the original payment(s). You must enter the full credit card number of the card to which you're making the refund payment.
To refund as a credit refund, select Credit Refund and ensure Refund Amount is a negative number.
To refund using a stored payment method, select Stored Payment. In Stored Payment Method, select the stored payment method from the payment gateway of the selected entity to use for the refund. Only stored payment methods for the selected entity display.
In Note, feel free to add any important information to be saved on the payment.
Click Save.
Use Original Payment Method for Refund
Nimble AMS currently does not support refund with a payment method other than the one used to pay for the order. You can refund only with the payment method used to make the payment. For example, if an order is submitted using New Credit Card, the refund must also be done with the same and cannot be completed with any other payment method like Stored Payment Method, etc.
One Payment Wizard: Apply single payment to multiple orders
Associations on many occasions receive a single payment that has to be applied to multiple orders. One such example is a company paying individual membership dues or event registration fees for all its employees. Nimble AMS now provides a robust and user friendly way for staff users to apply a single payment to multiple orders. One Payment - Staff View feature allows staff users to select orders with outstanding balance and apply a single payment in a time efficient manner.