AR Trial Balance
AR Trial Balance enables Accounting Staff and Administrators to produce a report on outstanding Accounts Receivable based on a point-in-time through the "As Of Date" field.
AR Trial Balance is an add-on feature to Nimble AMS - if you would like to see if this is installed within your environment you can follow the click path below:
- From Setup, Search and Navigate to Installed Packages
- Review Installed Packages and look for "AR Trial Balance"
If this is not installed and this feature would be of use to your organization or you would like to see if there have been any updates since your installation, please reach out to Nimble AMS Support for assistance.
Permissions
If a non-administrator staff user will need to run the AR Trial Balance, they will need the following permission(s):
- Modify All on the AR Snapshot object
It is recommended that, rather than granting this permission to every user, a permission set (external) should be created and assigned to users as needed.
Running An AR Trial Balance
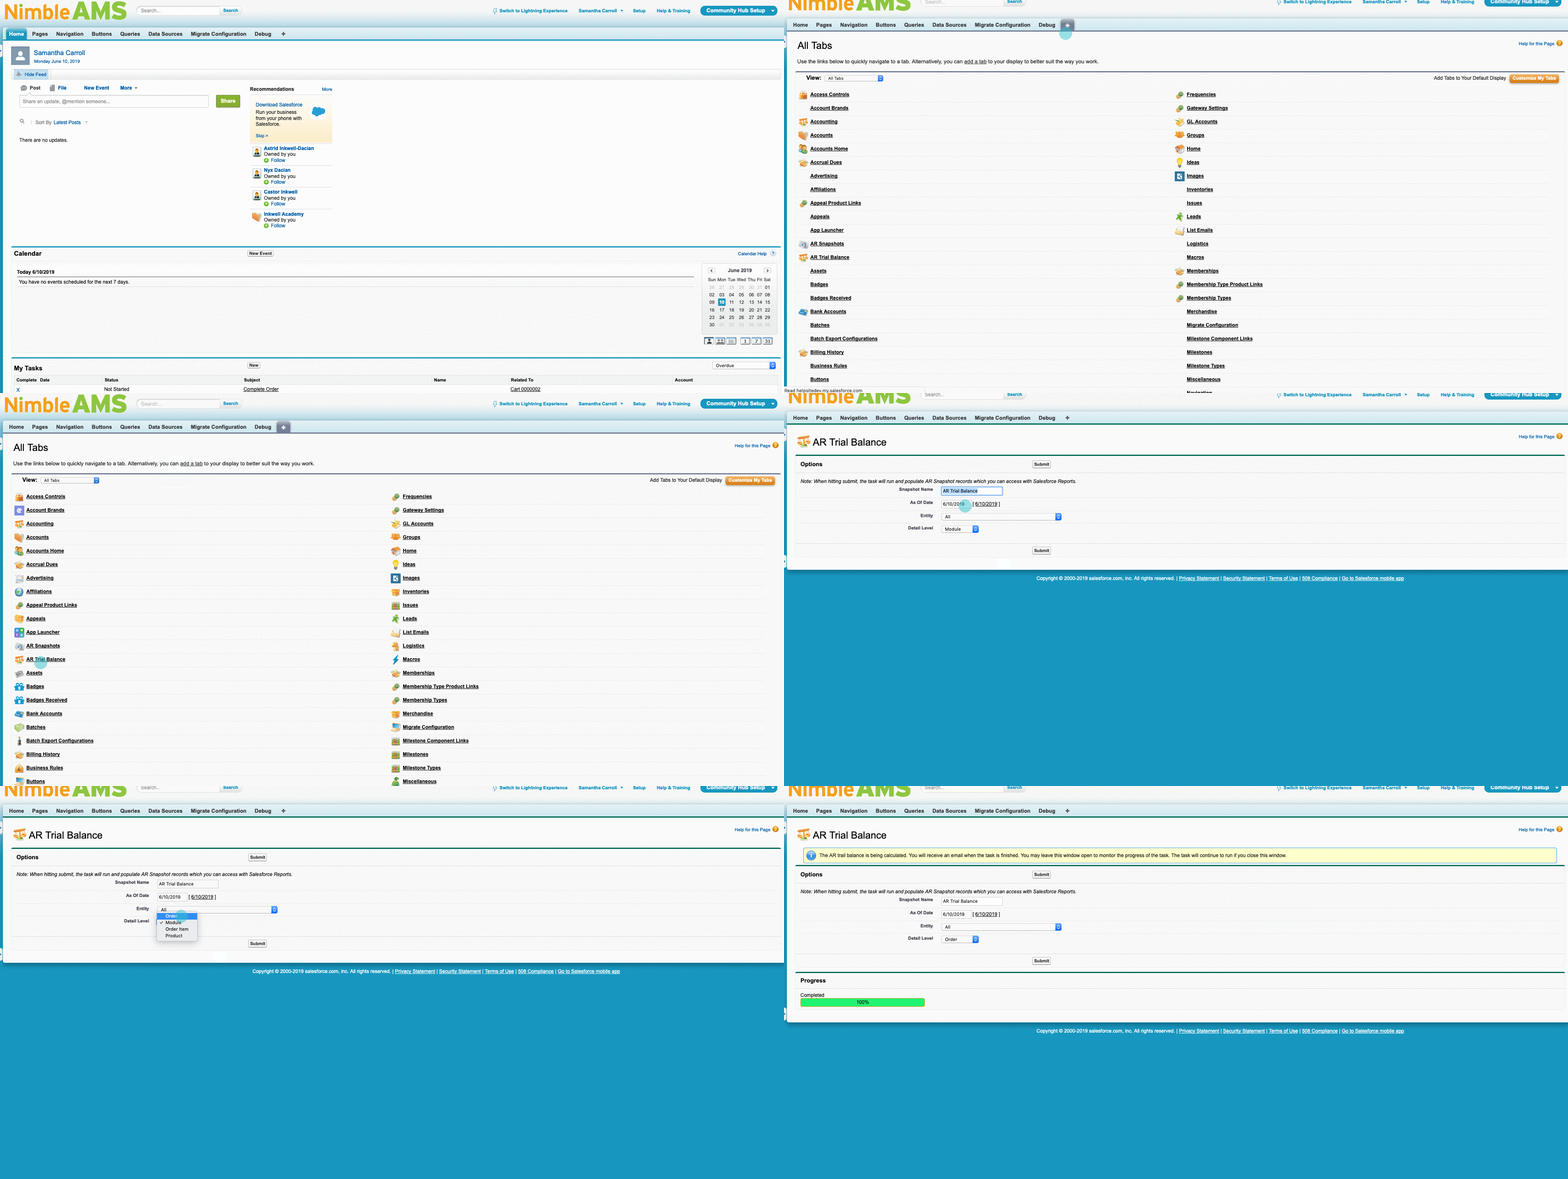
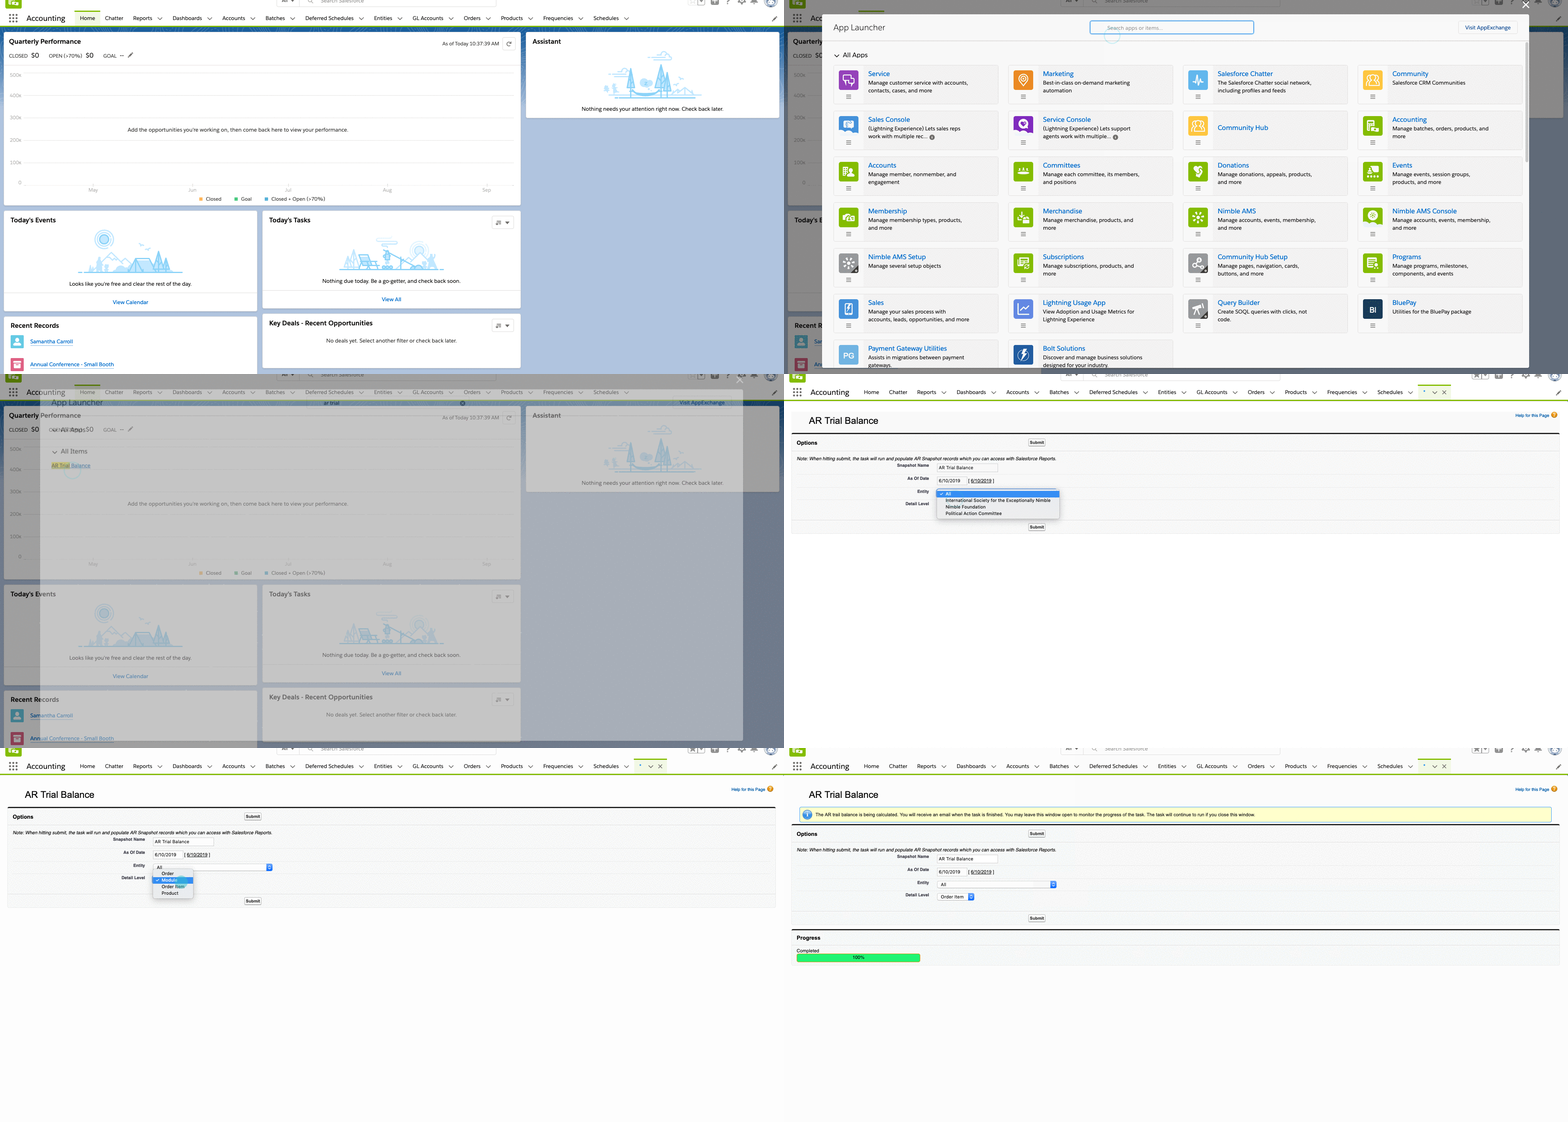
- From Salesforce Classic, select All Tabs ( + ), or from the Lightning Experience, select the All Apps Button, and navigate to the AR Trial Balance tab
- This is a Visualforce form with a set list of fields.
- This will automatically open and begin the process to run the AR Trial Balance. Staff will need to provide the following information:
- The Snapshot Name
- This will default to "AR Trial Balance"
- The As Of Date.
- Entity the AR Trial Balance needs to pull date from.
- This will provide a dropdown set of options to choose between and can be set to either "All" or any one entity defined within the org.
- Detail Level
- Module - basic information; the most general detail level.
- Order - base AR Snapshot on order level
- Order Item - base AR Snapshot on order item level
- Product - base AR Snapshot on the product level purchased by specific users
- This detail level can be both extremely specific or more generic based on how the details are sorted.
- Example: If a membership requires 3 products and staff need to know what the AR is at for each specific product rather than the membership as a whole, you would need to run the AR Trial Balance at the Product level. Grouping this by Product would give a more generic overview of AR for products, but grouping this by Account will provide a more detailed overview for the Account in question.
- This detail level can be both extremely specific or more generic based on how the details are sorted.
- The Snapshot Name
- Click Submit.
- The process runs to find the Order Items that had a non-zero balance on the As Of date for the entity or entities selected.
- Staff can see on the form when the process has run and completed through the progress percentage bar.
- Run any relevant AR Trial Balance Salesforce reports that have been created by staff to pull in data that has been created through the AR Trial Balance, from the AR Snapshots object.
- Any report created to show AR Snapshot data must filter on the Snapshot Name and/or As Of Date so that this will includes only the correct AR Snapshot records, not all records in the object, and may need to be updated on each run to meet the criteria of the AR Snapshot data needed.
Creating The 'AR Aging Matrix - Point in Time' Report
The AR Trial Balance feature does not include standard reports to pull the AR Snapshot data, so at least one AR Trial Balance report will need to be created to view and report on these records.
In addition, orders with refundable balances will not have a product name listed beside the balance when AR Trial Balance is run at the at the 'Product' detail level. Due to this disconnection, these orders would not be included in any reports created with the "AR Snapshots with Products" report type. In order to pull this data into a report, a new custom report type will need to be made to pull in 'AR Snapshots with or without Products"
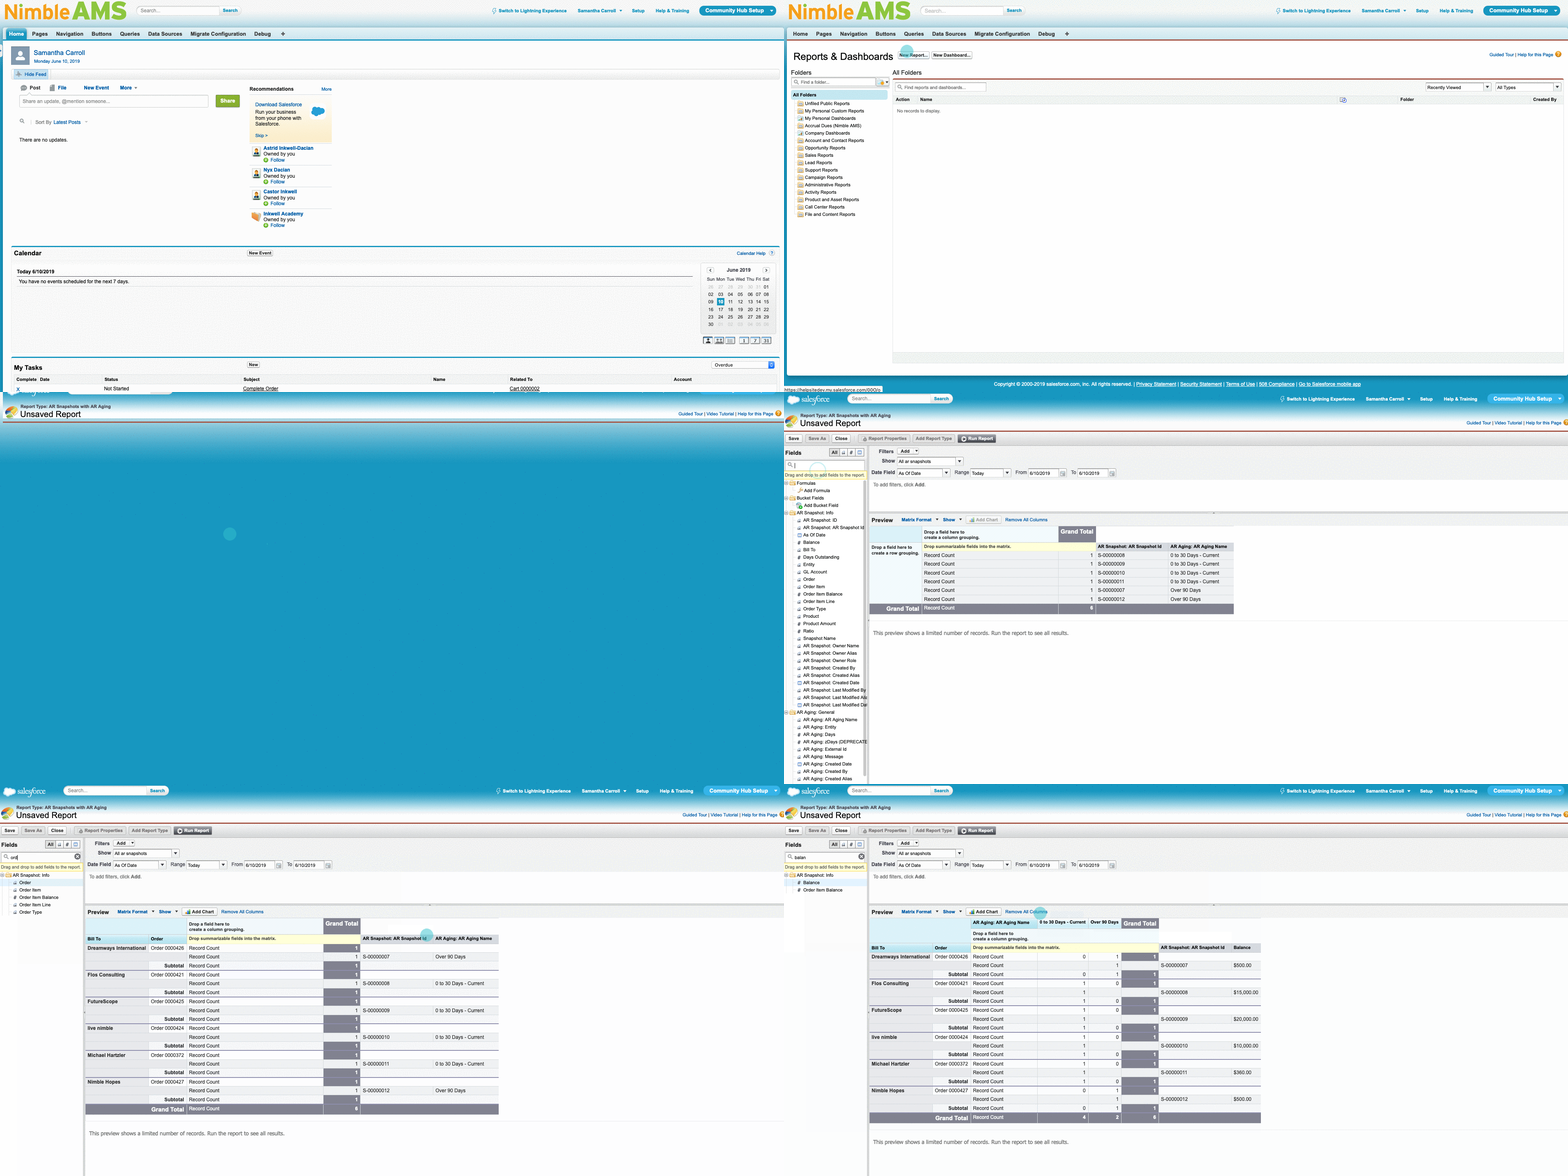
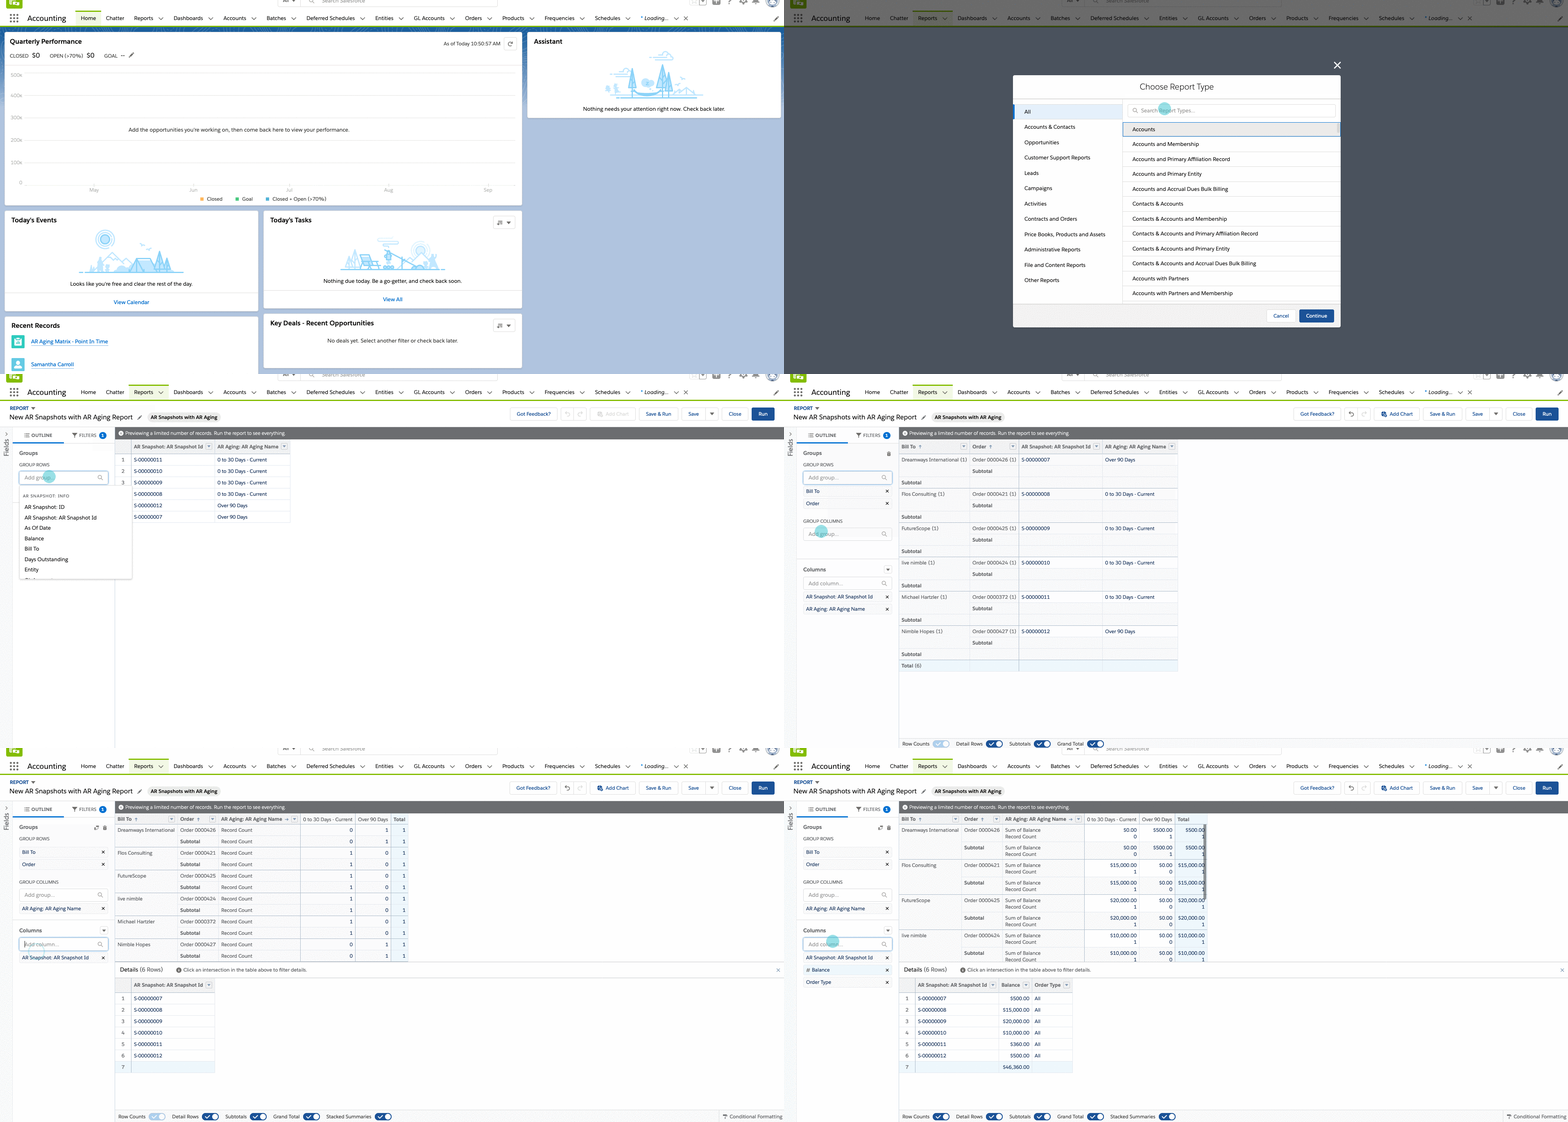
- From Salesforce Classic, select All Tabs ( + ), or from the Lightning Experience, select the All Apps Button
- Navigate to the 'Reports' object and select New Report.
- Within the Report Type Search Bar, search for the 'AR Snapshots' report type or a custom report type of your choosing and click create.
- A custom report type could be made to include in any additional custom fields desired that come from related objects - for example, the Account or the Order, rather than needing to modify the AR Snapshot object itself.
- Create Groupings
- In Salesforce Classic, change the report format from Tabular to Matrix and pull the Bill To and Order fields as the row criteria, and AR Aging: AR Aging Name field as the column grouping
- In Lightning Experience, search for and select the Bill To and Order fields under Group Rows and search for and select the AR Aging: AR Aging Name field under Group Columns
- Insert Fields
- In Salesforce Classic, search for the following fields and then drag and drop them into the field bar above your column grouping:
- # Balance
- Order Type
- AR Snapshot: AR Snapshot Id
- As of Date
- In Lightning Experience, search for and select the fields noted above in the 'Columns' section below your Group Columns section
- In Salesforce Classic, search for the following fields and then drag and drop them into the field bar above your column grouping:
- Under Filters, select the following:
- Show Me: All AR Snapshots
- As of Date
- Balance / Greater Than / $0.00
Save and run the report
If you have not yet run the AR Trial Balance or the As of Date is not set, this report will remain blank until updated or the AR Trial Balance process has been run. If, upon reviewing the report, you see that an order was missed or not processed before running the AR Trial Balance, you can run this again after the order has been processed and the AR Trial Balance will update to the most recent set of data.


