Staff can create a merchandise product to which will display on the store page or the lightning store which community hub users can purchase.
In the the tab bar, click , App Launcher or in Salesforce Classic, click , Nimble AMS, Staff View, Button, All Tabs.
Click Products.
Click New.
In Record Type of new record, select Merchandise.
Click Next.
Enter information:
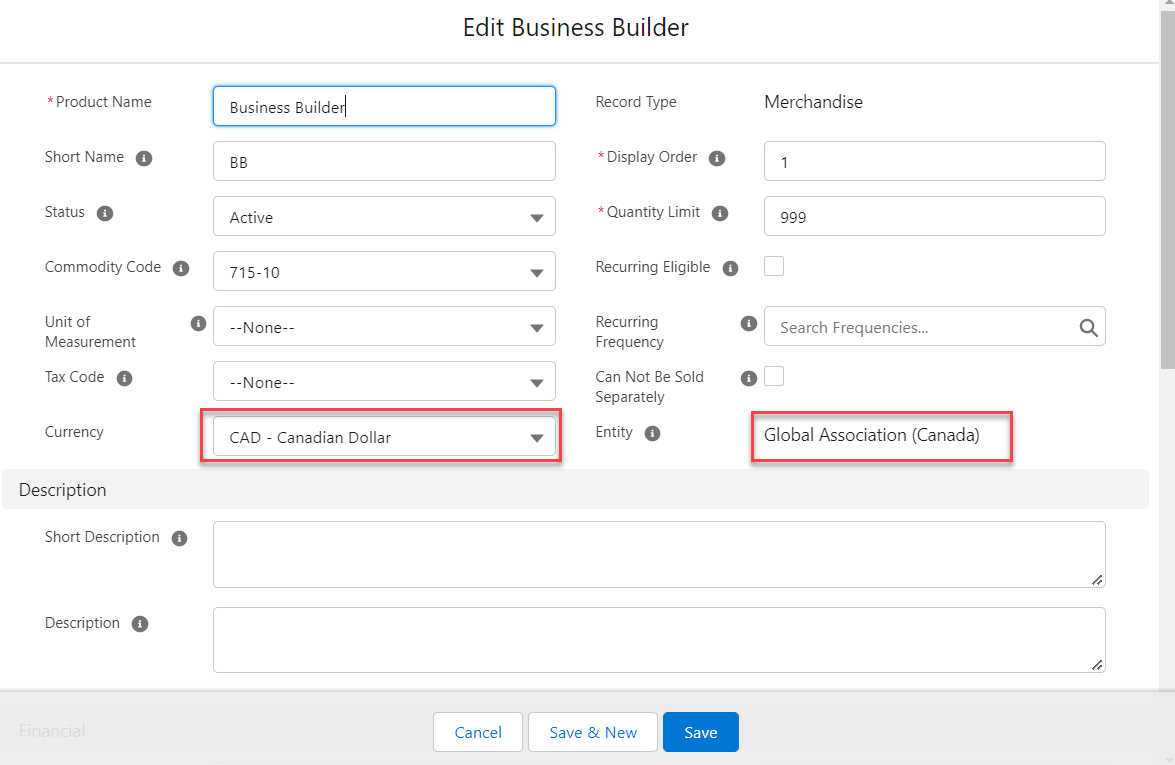
a. In Product Name, enter the name of merchandise product to be shown in the Staff View and Community Hub order process.
b. Optionally, in Short Name, enter a short name that identifies the merchandise product. This is helpful for reporting. This field is required if your association uses Level 2 and Level 3 credit card processing.
c. In Display Order, enter a number to signify where in the store page this product should be displayed. The lower the number, the higher the product is shown.
Note
The number should be 0 - 999.
Consider spacing out your numbers to accommodate future changes in products.
d. If your association uses Level 2 and Level 3 credit card processing, in Commodity Code, select the commodity code used to classify the product.
e. If your association uses Level 2 and Level 3 credit card processing, Unit of Measurement is populated. Check with your administrator to see if you need to select a different value.
7. Enter description information:
a. Optionally, in Description, enter a description of the merchandise product which is shown on the Product Details page in community hub.
b. Optionally, in Short Description, enter a short description, which is shown in the Store page in community hub.
8. Enter accounting information:
a. In List Price, enter the suggested product price. This amount is displayed in the Staff View order process and can be changed by staff. This is also displayed on the Product Details page in community hub.
b. In Revenue GL Account, enter the GL account to use for the product transaction(s).
c. Select Taxable if the product is taxable.
d. In Entity, enter the name of the entity that owns this product, click ,Nimble AMS, Staff View, Button, Lookup, and select the entity.
9. Optionally, inCurrency,select the right currency value.
Note
If you have enabled Salesforce multi-currency, Salesforce introduces theCurrencyfield on all object layouts within your org.
While creating a New Merchandise Product record make sure to select the Currency field value that matchesthe Currency field value on the linked Entity record. If theCurrencyfield value of Entityand MerchandiseProductdoes not match, then it throws an error.
Also, once the record is saved, you will not be allowed to edit the value of theCurrencyfield.
Show Me An Image
10. Enter shipping details:
a. If the product requires shipping, select Shippable.
b. In Weight (Pounds), enter the weight of this product.
11. Enter inventory details:
a. If you want to track the inventory level of this product, select Track Inventory.
b. If prior sales of this product impact your inventory level, in Inventory Used, enter the quantity of this product sold.
c. In Inventory, enter the initial inventory help of this product.
12. Select Community Hub settings:
a. If you would like the product to be shown in Community Hub, select Self Service Enabled.
b. In Web Product Image URL, enter the absolute URL of the primary image of this product.
c. If you want to allow Bill Me during community hub checkout, select Bill Me Enabled.
JavaScript errors detected
Please note, these errors can depend on your browser setup.
If this problem persists, please contact our support.