
Enablement and Configuration of Cancel Membership Mid-Term
Associations sometimes need to cancel a membership part-way through a member’s term and issue a refund without backing out recognized revenue for the previously recognized months of the membership term.
Nimble AMS supports full membership cancellation and refunding the money back. This does reverse the financial entries made around deferred revenue and recognized revenue. With Cancel Membership Mid-Term feature we are now providing an ability for staff to easily process a membership mid term cancellation and reconcile the term and money.
Suppose the administrator has configured the Account or Membership pages with Manage Membership LWC (Lightning Web Component). In this case, the staff user can click Cancel Membership on the LWC to cancel the membership in between the term. Depending on cancellation date, if a refund is applicable, the staff user can opt for it, for the member. The refund will be done on prorate basis depending on the unused duration of the membership. For example, if a membership with a duration of 12 months costs $120 and is canceled after two months, $20 will be charged and $100 refunded to the member. Membership cancellation will also impact installments, recurring and deferred schedules if they are linked to the order.
Prerequisites
You must be using Nimble AMS Lightning experience. Learn more.
To use Cancel Membership Mid-Term feature, an active or future membership must be present on the account.
- If using deferred schedules, edit the page layout and remove the following fields:
- Recognition Amount
- Recognition Health
Enablement Steps
To enable this feature for staff users, assign the permission set Nimble AMS Manage Membership to them. If this permission set is not present, create it and ensure NU.Manage Membership is added to Enabled Custom Permissions column.
From Setup, enter
Permission Setsin the Quick Find box, then selectPermission Sets.Click New.
In the Label, enter
Nimble AMS Manage Membership.Make sure that the API Name is populated.
Leave rest of the fields as they are and click Save.
From the permission set, click Custom Permissions and Edit.
Select NU.Manage Membership permission and click Add to move it to Enabled Custom Permissions column.
Click Save.
Without proper permissions, staff users will not see the
Manage MembershipLWC on the Nimble AMS Account Record, Nimble AMS Person Account Record and Nimble AMS Membership Record, even when these LWCs are added to them. This permission enables Associations to allow only the selected staff members to use Cancel Membership Mid-Term feature as giving access to everyone can cause unintentional or mistaken transactions.
Configuration
Staff users can add the Manage Membership LWC to custom Account and Membership pages so that they can cancel the membership during the term. Using this LWC, they can also refund (if applicable) the prorated amount for the remaining tenure of the membership.
The Manage Membership LWC will be available on Nimble AMS Account Record, Nimble AMS Person Account Record, and Nimble AMS Membership Record pages by default. Two default visibility filters are added with the LWC, to ensure that the LWC is visible only in case of an active or future membership, and not during the grace period or re-instate period of the membership. You do not need to manually add the LWC and these basic visibility filters if using Nimble AMS Account Record and Nimble AMS Membership Record pages.
To add the Manage Membership LWC and two basic visibility filters to custom Account and Membership pages, follow the below steps:
1. Add Manage Membership LWC (Lightning Web Component) and visibility filter to Account page
To use Cancel Membership Mid-Term feature, add the Manage Membership LWC on the Account page. You can add this LWC to the section on the right or any other section of the page.
To add Manage Membership LWC to the page, and set its visibility filters, follow the instructions given below:
Navigate to an account, and edit the page. In the custom components section, drag and drop the Manage Membership LWC on the page.
Select the newly added LWC.
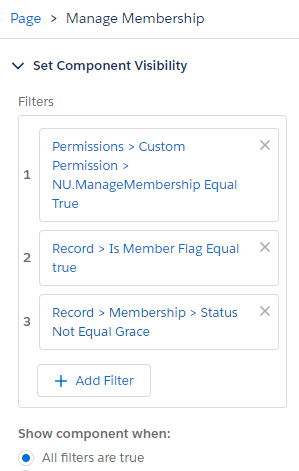
Now you can set the visibility filter for this LWC. Adding the visibility filter is important to ensure the LWC is visible only when certain conditions are met. We recommend adding the visibility filter to ensure the LWC does not display in the membership’s grace period or re-instate period, and displays only when the user has a current or future membership.
To add this visibility filter to the Manage Membership LWC, follow the instructions given below:
Select the newly added LWC.
In the Set Component Visibility section on the right, click + Add Filter.
Click Advanced.
In field, make the following selection:
4. Save and Activate the page.
Expected Result
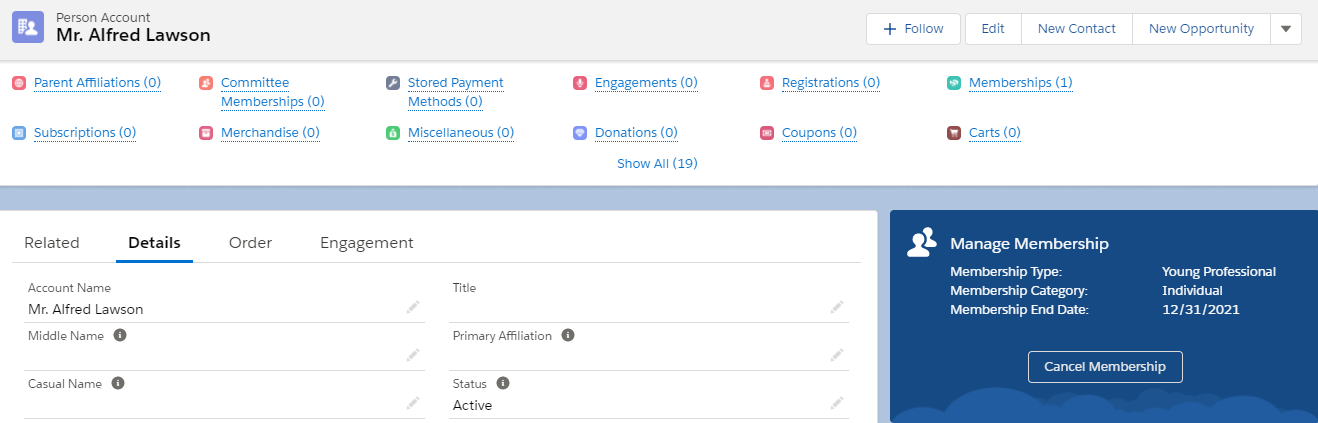
Adding the Manage Membership LWC to the account page will render the Cancel Membership component on this page, if the user has an active or future membership to cancel. Staff users can click Cancel Membership to initiate cancellation in between membership term, and then select the new End Date for the membership. Staff users can also credit the refund to member based on the prorated amount or simply cancel the membership.
2. Add Manage Membership LWC (Lightning Web Component) and visibility filter to Membership page
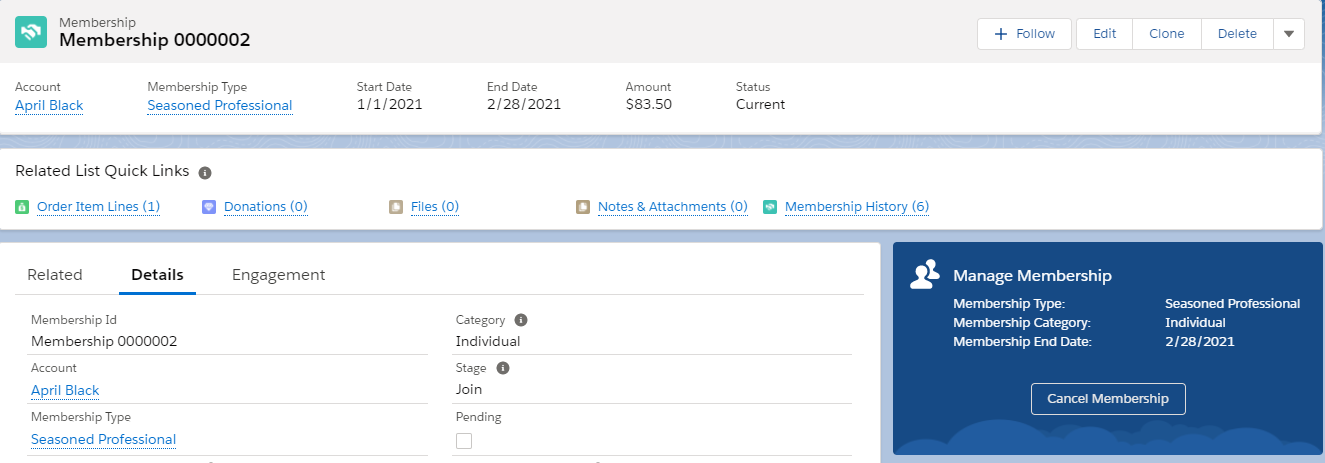
To use Cancel Membership Mid-Term feature, you can also add the Manage Membership LWC on the Membership page. You can add this LWC to the section on the right or any other section of the page.
To add the Manage Membership LWC to the page, and set its visibility filters, follow the instructions given below:
Navigate to an account, and edit the page. In the custom components section, drag and drop the Manage Membership LWC on the page.
Select the newly added LWC.
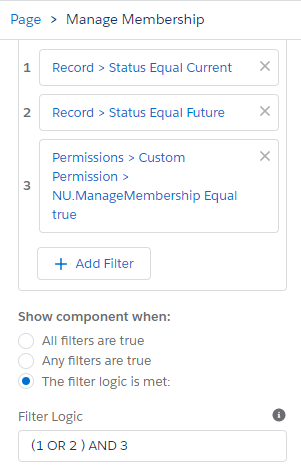
Now you can set the visibility filter for this LWC. Adding the visibility filter is important to ensure the LWC is visible only when certain conditions are met. We recommend adding the visibility filter to ensure the LWC does not display in the membership’s grace period or re-instate period, and displays only when the user has a current or future membership.
To add this visibility filter to the Manage Membership LWC, follow the instructions given below:
Select the newly added LWC.
In the Set Component Visibility section on the right, click + Add Filter.
Click Advanced.
In field, make the following selection:
4. Save and Activate the page.
Multiple Memberships
From an account, you can only cancel the latest membership using the Manage Membership LWC. If an account has multiple memberships, the staff user must go to each membership record to cancel the memberships.
Limitations
This feature is not supported in Community Hub.
The
Manage MembershipLWC will only adjust the membership term and refund money (if applicable) once. It does not support re-adjusting the membership term. That can be done from order processor.