This page describes the recipe for configuring GL Exports feature, to export GL files in the file formats (.csv, .txt and .iif) supported by Nimble AMS.
Ingredients:
-
Installed GL Export Package
Steps:
To configure GL Exports feature, follow the steps/column applicable to the file format/GL system you are using, as given below:
|
GL Export File formats |
|||
|---|---|---|---|
|
Step |
.csv |
.txt (Header.txt and Detail.txt) |
.iif |
|
Example GL Systems using this format |
|
|
|
|
Batch Export Configuration |
|
|
|
|
Entity |
On each entity, set the Batch Export Configuration record created above that will be used for the entity's export files to export the transactions of the particular entity. |
On each entity, set the Batch Export Configuration record created above that will be used for the entity's export files to export the transactions of the particular entity. |
On each entity, set the Batch Export Configuration record created above that will be used for the entity's export files to export the transactions of the particular entity. |
|
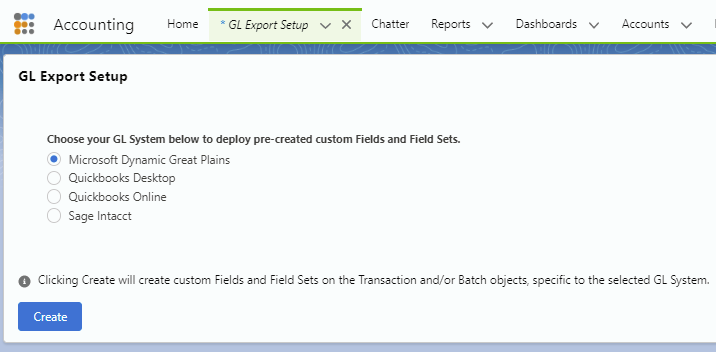
Deploy custom fields and field sets |
For ease and quicker set up you can use the field sets created by us for the following GL systems:
To deploy these pre-created fields & field sets on the Transaction object, follow the below steps:
Wait for the success message. |
For ease and quicker set up you can use the field sets created by us for the following GL systems:
To deploy these pre-created fields & field sets on the Transaction & Batch object, follow the below steps:
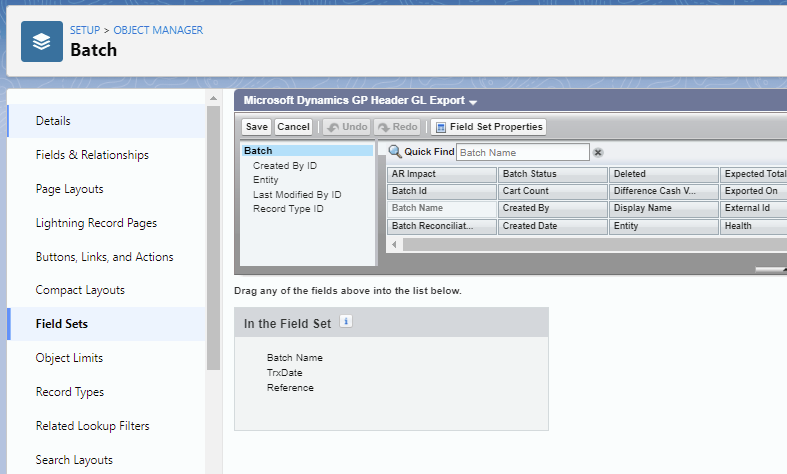
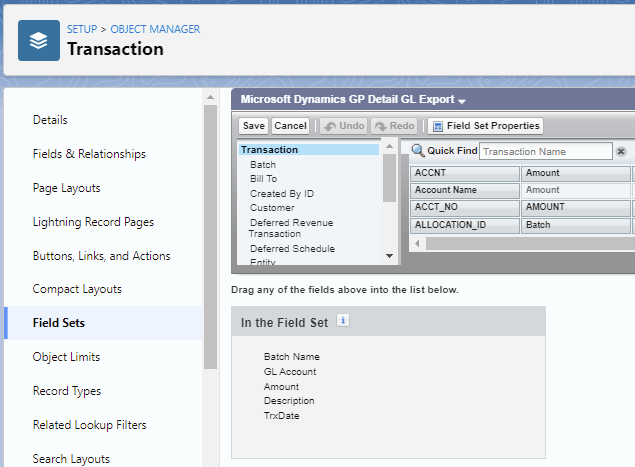
Wait for the success message. Note: For Microsoft Dynamics GP, you will require two field sets:
|
For ease and quicker set up you can use the field sets created by us for the following GL systems:
To deploy these pre-created fields & field sets on the Transaction object, follow the below steps:
Wait for the success message.
|
Batch Object - Header GL file Field Sets 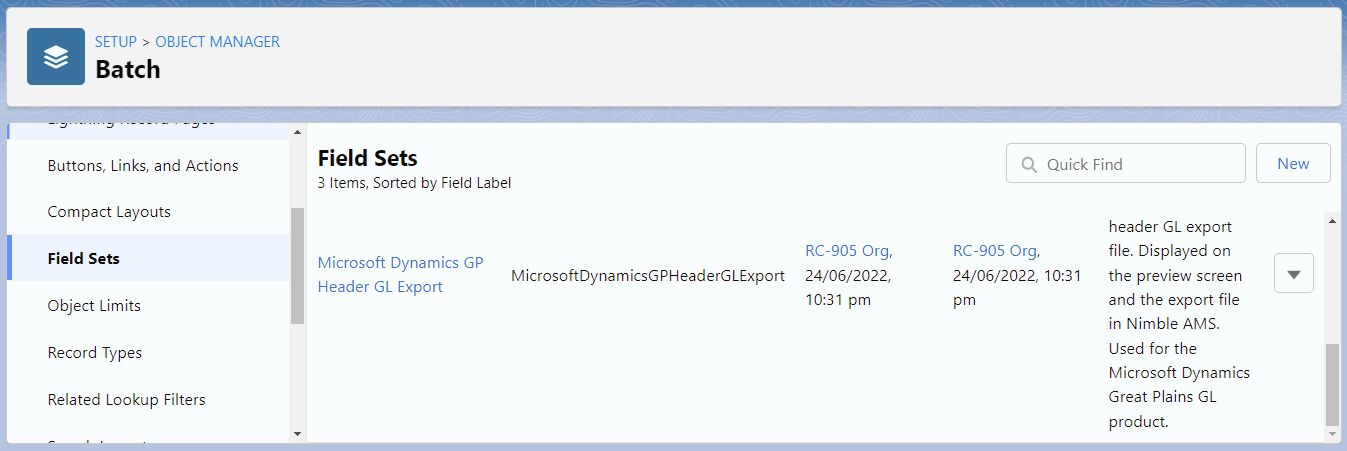
Transaction Object - Detail GL file Field Sets 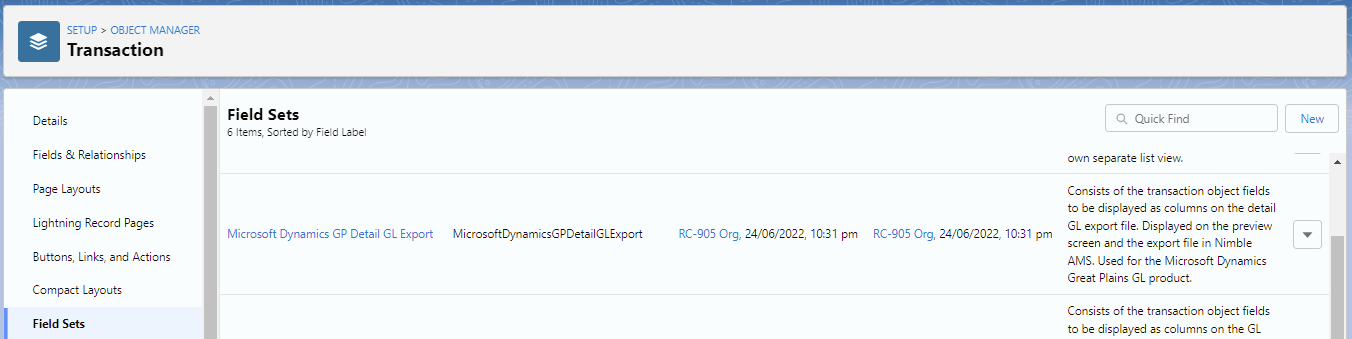
|
|||
|
Where to find the deployed fields and field sets?
|
|||
|
From Setup, update/create the GL Export Setting Custom Metadata Type record. Use the below values: |
|||
|
Label |
GL Export |
GL Export |
GL Export |
|
GL Export Setting Name |
GL_Export |
GL_Export |
GL_Export |
|
Batch Field Set Name |
Leave this as blank. |
Enter the API name of the field set created on the Batch. For Microsoft GP (recommended): MicrosoftDynamicsGPHeaderGLExport |
Leave this as blank. |
|
Fields to Group By |
Enter the field API names as per your requirement. For Sage Intacct (recommended): NU__Batch__r.Name, NU__GLAccount__c For QuickBooks Online (recommended): You can leave it as blank or define as per your requirements. |
Enter the field API names as per your requirement. For Microsoft GP (recommended): TransactionDateGP__c, BatchNameGP__c, GLAccountGP__c, TitleGP__c |
Enter the field API names as per your requirement. For QuickBooks Desktop (recommended): DateQD__c, NU__Batch__r.Name, NU__GLAccount__r.Name, NU__Entity2__r.Name,TitleQD__c, DetailQD__c
|
|
Fields to Order By
|
Enter the field API names as per your requirement. For Sage Intacct (recommended): NU__Batch__r.Name For QuickBooks Online (recommended): You can leave it as blank or define as per your requirements. |
Enter the field API names as per your requirement. For Microsoft GP (recommended): TransactionDateGP__c, BatchNameGP__c |
Enter the field API names as per your requirement. For QuickBooks Desktop (recommended): DateQD__c, NU__Batch__r.Name, Name |
|
Transaction Field Set Name |
Enter the API name of the Transaction field set. For Sage Intacct: SageIntacctGLExport For QuickBooks Online: QuickBooksOnlineGLExport |
Enter the API name of the Transaction field set. For Microsoft GP (recommended): MicrosoftDynamicsGPDetailGLExport |
Enter the API name of the Transaction field set. For QuickBooks Desktop (recommended): QuickBooksDesktopGLExport |
|
Use Header |
Select this check box to display the header (column names or field labels) in the GL file. |
Select this check box to display the header (column names or field labels) in the GL file. |
Select this check box to display the header (column names or field labels) in the GL file. |
Table 1: GL Export File formats
For .csv, optionally, update GL Export Custom Field Metadata Type(s)
If there is to be custom logic within the GL export, it can be included by configuring the GL Export Custom Field metadata type. Details on the fields within the GL Export Custom Field CMT are listed below.
|
Field |
Value |
|---|---|
|
Label |
Meaningful name for this configuration record. |
|
GL Export Custom Field Name |
API name of this configuration record. |
|
Class Name |
The name of the class that will do the logic that populates this field. See Class Names in Table 3. |
|
Context |
Any additional data the custom field may need to do its job. Not required by every field.
Required for the following Class Names:
|
|
Field Name |
The name of the field to wrap with the logic.
Contains the API name of the field to use to override the format of the GL Export. The overriding action will be based on the ClassName assigned to the CMT record. This field is required for the following Class Names: TrailingEmptyCellCustomField
|
Show Me How To Do This...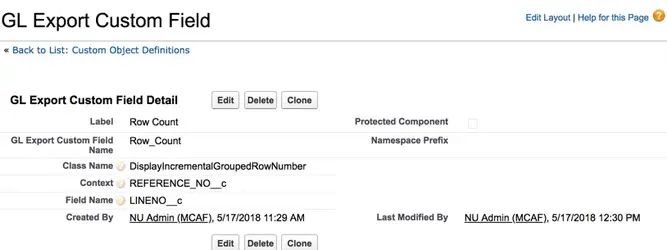
GL Export Custom Field CMT |
|
Table 2: GL Export Custom Field CMT
Class Names used under the Export Custom Field CMT
These are custom Apex Classes that are installed along with the GL Exports package to modify the format of the GL Export that is generated. These values are used when creating CMT records for the GL Export package.
|
Apex Class |
Purpose |
|---|---|
|
TrailingEmptyCellCustomField |
Adds a number of empty cells/columns after this cell equal to the number in the context field. ie context = 3
Note: When using this class, the Field Name field in the CMT must be populated. |
|
RowCountGlExportCustomField |
Counts the total number of rows in the Export. |
|
DisplayPositiveDebitCreditValues |
Adds all credits and debits within group |
|
DisplayIncrementalGroupedRowNumber |
Counts the number of rows within a group. ie: 1, 2, 3, 4, 5, etc. |
|
DisplayFirstGroupedRowValue |
Only displays the full row/columns of detail for the first row in a group. Groups are set via the "Fields to Group By" |
Table 3: Class Names