Overview
The Dynamic Grid Setup Wizard is a guided configuration interface that enables administrators to create and manage Dynamic Grids and Dynamic Grid Actions without directly working with underlying Custom Metadata Type (CMT) records.
The wizard walks you through each required configuration area, reducing complexity, setup time, and configuration errors.
Key Concepts and Terminology
The following terms are used throughout this guide:
-
SOQL Query - Defines the query that retrieves records displayed in the grid.
-
Data Source - Represents a collection of records returned by the SOQL query or Apex execution.
-
Dynamic Grid Data Source - Controls how records are visually rendered in the grid, including layout and formatting.
-
Dynamic Grid Configuration - Represents the Experience Cloud–facing configuration used by the Dynamic Grid LWC. A single configuration can contain multiple data sources.
-
Dynamic Grid - A complete grid implementation composed of:
-
SOQL Query
-
Data Source
-
Dynamic Grid Configuration
-
Dynamic Grid Data Source
-
-
Dynamic Search - Defines searchable fields and search behavior within the grid.
-
Dynamic Filters - Configurable filters that allow users to refine grid results.
-
Dynamic Actions - Record-level actions that allow users to interact with grid data.
Permissions
To access the Dynamic Grid Setup Wizard, users must be assigned the NAMS Setup permission set.
Assigning the Permission Set
-
From Setup, search for Users
-
Select the appropriate user
-
Click Permission Set Assignments
-
Click Edit Assignments
-
Search for NAMS Setup
-
Enable the permission set and click Save
Prerequisites
Ensure the following prerequisites are met before using the Dynamic Grid Setup Wizard:
System and Feature Prerequisites
-
NAMZ-Core 0.12 version and above
-
Dynamic Grid is only available in the Member Portal
Accessing the Dynamic Grid Setup Wizard
-
From the App Launcher search for and open NAMS Settings
-
Navigate to the section where Dynamic components or grids are managed. Look for the Dynamic Grid and click on Manage Configurations.
-
Choose the option to create a new Dynamic Grid or to edit an existing one.
Step-by-Step Setup
The Dynamic Grid Setup Wizard is organized into a sequence of steps. Each step focuses on a specific aspect of the configuration. Use the following guidance to complete each step successfully.
1. Dynamic Grid Configuration
This step allows you to create, edit, or delete Dynamic Grid configurations.
Create a New Configuration
Choose this option if you are starting from scratch.
-
Click New Dynamic Grid Configuration
-
Enter a Label (this is what appears in Experience Builder) and Click Save
Edit an Existing Configuration
Choose this option if you already have a Dynamic Grid that you want to modify.
-
Click the dropdown next to an existing configuration
-
Select Edit
-
Make the required changes and Click Finish
2. Dynamic Grid Data Source
For a Dynamic Grid Configuration to display any products in the grid, data source(s) need to be linked to the configuration. This defines how data is presented to users, including which columns are shown, their order, and the visual formatting. In this step, you select/create the base data source(s) that the Dynamic Grid will use.
Create a New Data source
-
Click New Dynamic Grid Data Source
-
Provide a meaningful Label and Data Source Name
You may either:
-
Select an existing Data Source and proceed, or
-
Create a new Data Source
The Data Source is the collection of records that can be displayed in the Dynamic Grid. The Data Source is populated by a SOQL query or Custom APEX.
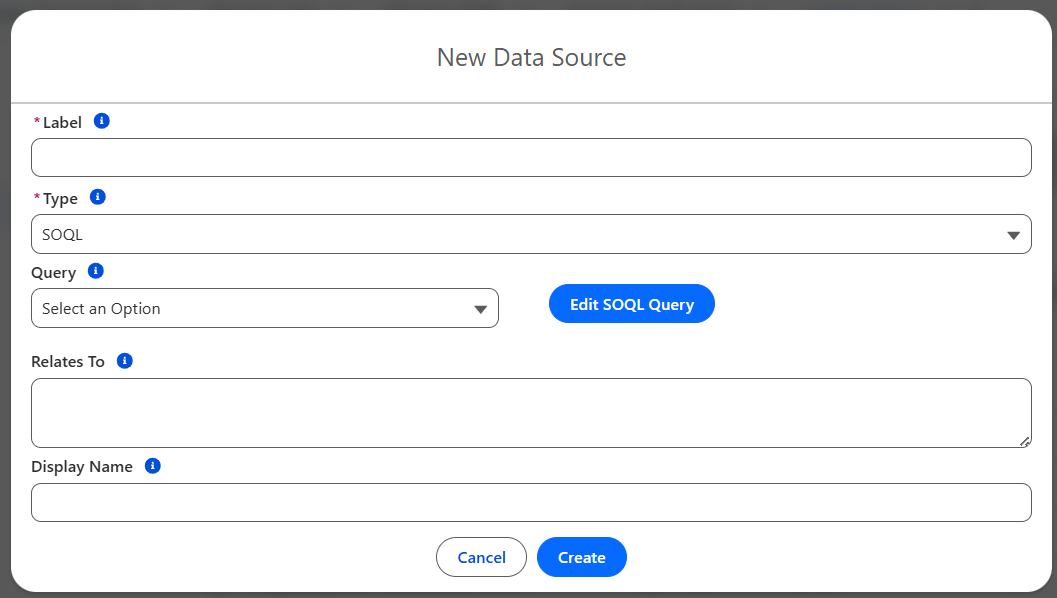
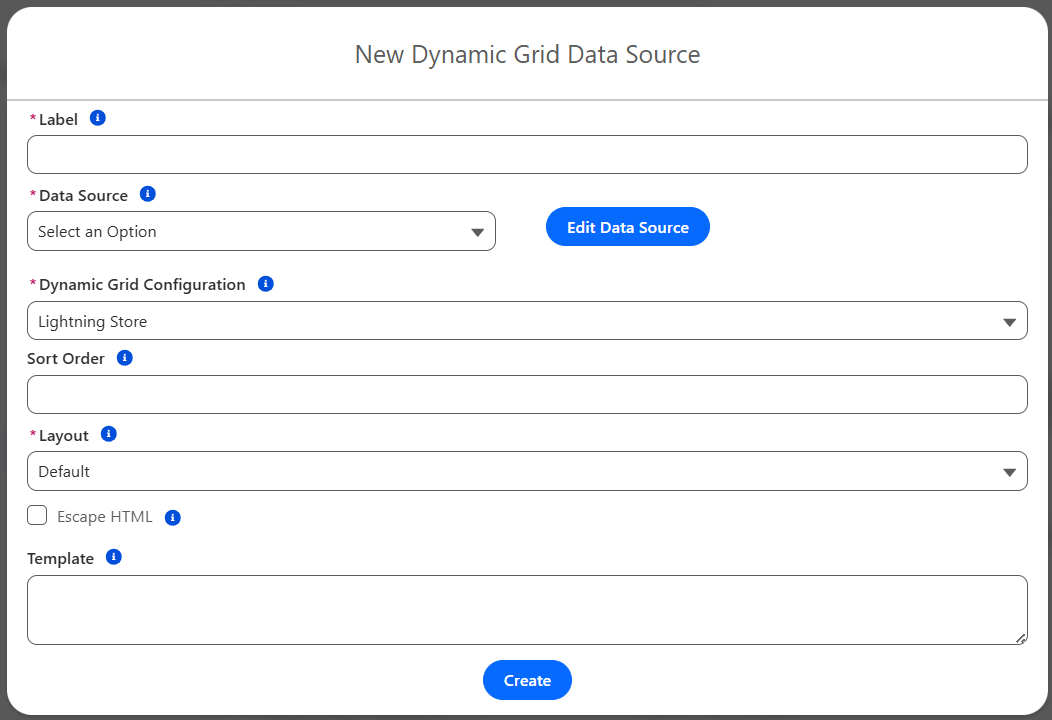
Creating a New Data Source
-
Enter a Label
-
Select Data Source Type:
-
SOQL for query-based sources
-
Apex for class-based sources
-
Context values:
-
SOQL Type: Enter the qualified API name of the Queries record
Example:namz__MerchandiseProducts -
Apex Type: Enter the name of the Apex class implementing
IApexdatasourceExecutor(class must beglobal)
-
Enter the Display Name
-
Confirm or update the Dynamic Grid Configuration (auto-populated)
-
Enter Sort Order (optional, required only if multiple data sources are used)
-
Select Layout:
-
Default
-
Rich Text (for custom HTML layouts)
-
-
Enable Escape HTML (recommended for security)
-
Enter HTML in the Template field if using Rich Text layout
The HTML that you enter will be used to render the individual records in the Dynamic Grid. You can add fields from your Data Source directly in the HTML by using the API name in {}'s.
ex:
<div style="margin-bottom: 14px;">
<div style="font-weight: 600; color: #555; margin-bottom: 4px;">Membership Type</div>
<div style="background-color: #eef3fd; padding: 6px 12px; border-radius: 8px; color: #2b5dab; font-weight: 500;">
{NU__MembershipType2__r.Name}
</div>
</div>
Will render the specified MembershipType’s Name like this:

-
Click Create
Repeat this process to add additional data sources if required.
3. Dynamic Actions
Dynamic Actions allow users to interact with records directly from the grid, triggering processes or displaying additional information.
Supported action types:
-
Apex Class
-
Screen Flow
-
Autolaunched Flow
-
Rich Text
-
Web Page Navigation
-
Experience Page Navigation
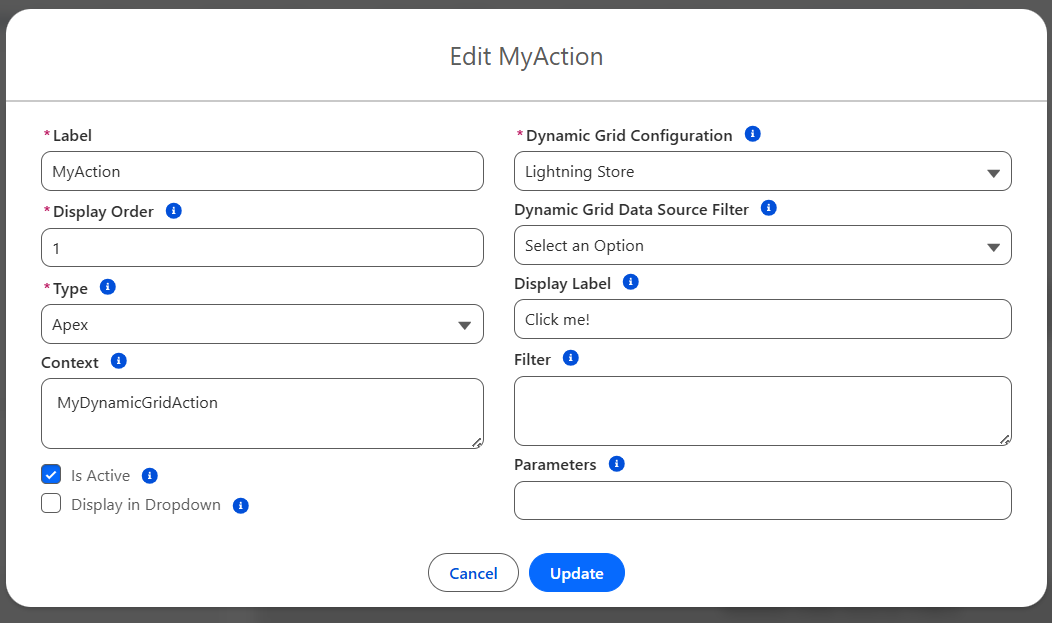
For each action, update the following fields:
-
Label - This is the label that will be displayed the users when view the action link on the Dynamic Grid
-
Display Order - If you have more than 1 Action in a Dynamic Grid this will control the order they are displayed in
-
Type: This is the Type of Action (ex: Apex class, Screen Flow, URL Navigation)
-
Context: The API name of the Flow or Apex class, The URL the navigation to, the Rich Text to display, etc
-
Is Active - Whether or not the action should display
-
Display in Dropdown - If selected, the actions will display in a dropdown menu instead of as buttons
-
Dynamic Grid Configuration - the Configuration for this action, this is prepopulated
-
Dynamic Grid Data Source Filter - Allows you to filter the action down and limit it to only display for records from a specific Dynamic Grid Data Source (Since Configurations can contain multiple Dynamic Grid Data Sources)
-
Display Label - Overrides the Label defined above
-
Filter - Allows you to further filter the action to only display on records that match the ciriteria you enter. ex: NU__RecordTypeName__c = “Student” would filter the action to only records there the Record Type Name is “Student”
-
Parameters - Any values that you want to pass into the action from the records (Ex: Id of the record). This is a CSV list.
For detailed action configuration, refer to the dedicated documentation:
LWC - Dynamic Grid Actions: Enablement and Configuration
4. Dynamic Filters
The Dynamic Filter improves your association members' browsing experience on the new Lightning Store. It allows them to easily refine their searches. With the support of the Parent Category and the respective Sub-Categories, your members' shopping experience will be precise, efficient, and convenient, enhancing their overall journey. To make the setup easier using this new interface, follow the steps below:
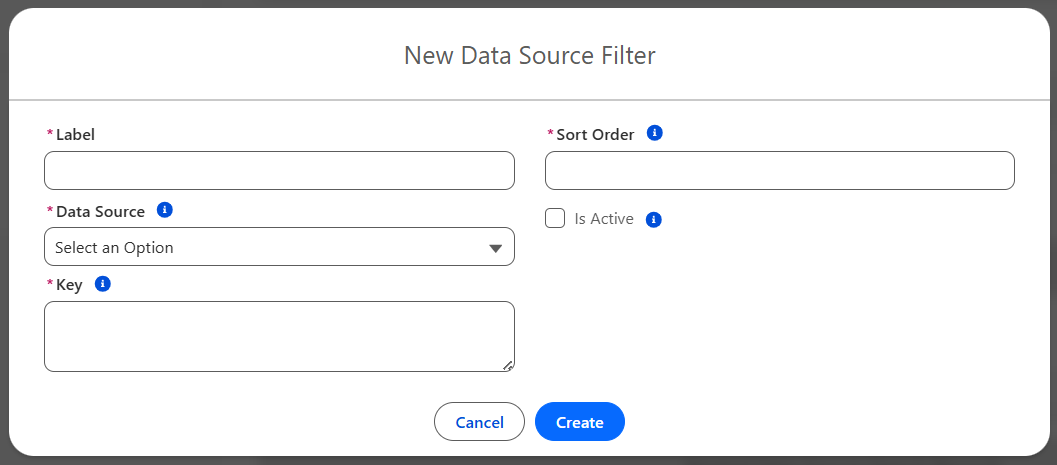
Create a Filter
-
Click on New Data Source Filter to open the modal.
-
Provide a meaningful name for the
Label. This name will be displayed against the Filter Category on the Store. -
In the Key, enter the API name of the appropriate field available in SObject.
-
Enter Sort Order, which specifies the sequence of items, with lower numbers appearing first.
-
Check the Is Active checkbox to activate the filter.
-
Click Create.
5. Dynamic Grid Search
Dynamic Search enables end users to quickly refine grid results using keywords. For example, your association wants the member to search through the Short Name and Short Description of a product to find the relevant products. OOB we already have a field named “NU__ShortName__c”, and “NU__ShortDescription__c“ that can be used instead of creating a new custom field for this use case. In the wizard, this step defines which fields participate in the search and how the search logic is applied. Here is how to create a new search capability for any field:
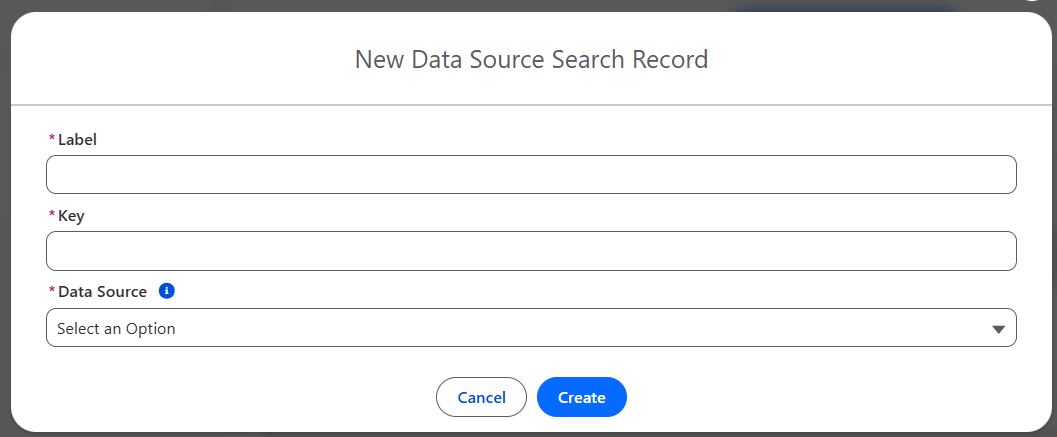
Add Additional Search Fields
-
Click New Data Source Search to create a searchable field other than Short name and Short description.
-
Enter the information below:
-
Label: Enter the appropriate Label for New Data Source Search Record.
-
Key: Provide the API name for a field to be searchable.
-
Data Source: Select the Data Source from the dropdown to which this search capability should be applicable.
-
-
Click Create.
Note: Fields must be included in the SOQL Query / Data Source for the Dynamic Grid
Deployment Note: After saving or updating a Dynamic Grid configuration, changes may take a few minutes to become available.
Refreshing the page is recommended to reflect the latest updates.
Troubleshooting
Use this section to document how to diagnose and resolve common issues
|
Issue |
Possible Cause |
|---|---|
|
The Dynamic Grid Setup Wizard may display stale or outdated data in one or more related records. |
CMT records are created asynchronously (in the background, not immediately), which can cause a temporary delay in data availability. During this async processing window, the Dynamic Grid Setup Wizard may not immediately reflect the latest updates. |