Overview
The Email Verification for Create Account feature enables Administrators to increase the security of their organizations by requiring email verification for new user accounts. This simple to use feature will reduce the number of fake accounts created for spam purposes. Once a new user signs up for an account, a verification code will be sent to their email. The new user then enters the verification code to verify their identity to complete the account creation prior to using their new account.
There are limitations to recognize prior to enabling this feature. The first being, the verify your account email is a Salesforce generic email with no customization ability for branding or messaging. Your members may perceive this generic email as spam without the branding ability. As the feature is utilized, non-verified requests will have an account but not a user record, which will require some clean up by Administrators, see the Reviewing Accounts That Have Not Been Verified section below for more details.
Data Flow

Enablement Steps
To enable this feature, perform the steps provided in the following section:
-
Go to Setup.
-
Go to Custom Metadata Type.
-
Click Manage Records next to Tag. (Community Hub).
-
Click Edit next to Email Verification.
-
Select Is Active.
-
Click Save.
Reviewing Accounts That Have Not Been Verified
After enabling this feature any accounts that do not verify their email will not have a User Record created and will be blocked from logging in.
In order to identify any Accounts in the org that were created, but not verified, Administrations can create a report.
Note: This will be a Joined report
-
Navigate to the 'Reports' object and select New Report.
-
Within the Report Type Search Bar, search for the 'Accounts and Contact' report type and click create.
-
Add the following Fields to the report:
-
Account Name
-
Account ID
-
Created Date
-
Contact ID
-
-
Add the following Filters to the report:
-
Show me: All accounts
-
Date: All Time
-
Record Type Name equals Individual
-
-
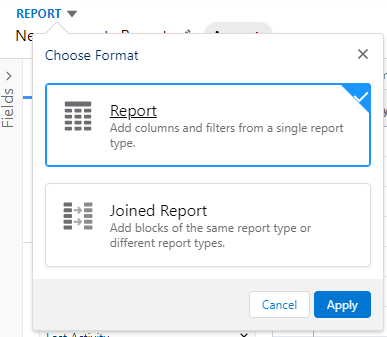
From the Report dropdown in the upper left, choose Joined Report and then Apply
-
-
Select Add Block
-
Within the Report Type Search Bar, search for the 'Users' report type and click Add Block
-
Add the following Fields to the Users Block:
-
User Name
-
User ID
-
Contact ID
-
-
Add the following Filters to the Users Block:
-
View: All accounts
-
Last Login: All Users
-
-
From the Outline menu, drag the Contact ID field to Group Across Blocks
-
Run the Report
After running the report, Administrators will see a list where each line represents an Account and its associated User Record (if it exists). Any Account record without a matching User record should be considered for cleanup.
Limitations
-
The Salesforce Verification Email is not customizable.
-
Non-verified accounts will need to be cleaned up.