Generate an email when an association member joins a waitlist
Recipe Overview
As an administrator, you can set up Salesforce automation tools to send an email notification to a member when he or she successfully joins a waitlist.
In this recipe, you will:
Configure Email Service in the org’s communication settings
If you already have it configured, then skip this step.
Create an email template you would like your members to see when they are added to the waitlist.
Create a Record Triggered flow to trigger the email notification.
Recipe Directions
Follow the directions for each phase of the process below. It should take one hour to set this up.
Configure SendGrid in the Org's communication settings
If you send out emails exceeding the Salesforce limit, then it is best to use SendGrid as your email service. If the email service is already configured for your org, then you can skip this step.
From Setup, search for Installed Packages.
Click on Configure next to the Nimble AMS package.

Figure 1. Configure tab
Scroll down to the Communication Settings section of the page.
Change the Email Service dropdown to SendGridEmailService
Set the Email Service From Address to
<YOUR_SENDER_EMAIL_ADDRESS>Set the Email Service API Key to
<YOUR_API_KEY>Set the Email Service From Name to
<YOUR_SENDER_NAME>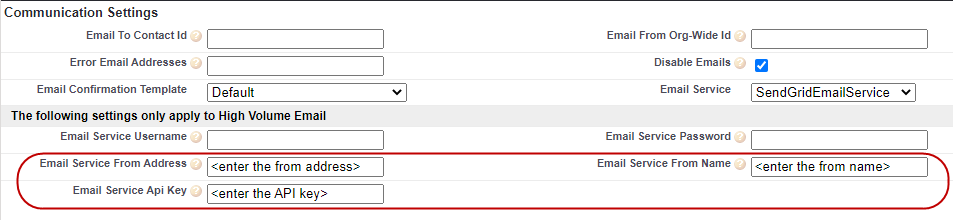
Figure 2. Fields to select in the Communication Settings
Click Save.
Create an Email Template
This template is only an example. Your association can create an email template that reflects your brand elements.
From the Setup Home tab, search for Classic Email Templates and select it.
Click on New Template button.
Select Text for the Template Type.
Click Next.
Check Available for Use.
Enter the Email Template Name
Template Unique Name will auto-populate
Enter text for Description
Enter text for Subject
You have been added to the waitlist for the {!znu__Waitlist__c.znu__Event__c} event
Enter text for the Email Body
Dear {!NullValue(znu__Waitlist__c.znu__FirstName__c, "Sir or Madam")}
Thank you for your interest in attending the {!znu__Waitlist__c.znu__Event__c} event and joining the waitlist.
Once a spot for registration opens up and is available, we will contact you to confirm the registration.
If you have any questions in the meantime, please do not hesitate to contact us.
Best regards,
The {!znu__Waitlist__c.znu__Event__c} Event Team
Click Save.
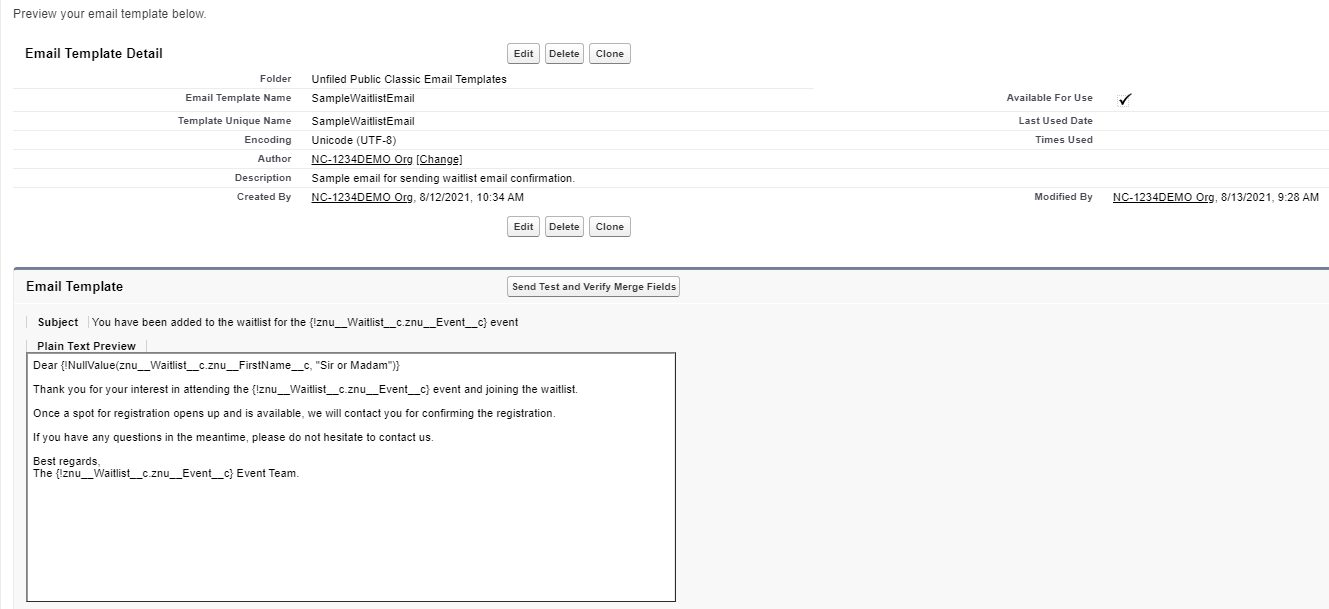
Figure 3. Sample email template
Configure a Record-Triggered Flow to trigger the Email Template.
From Setup, search for Flows and select it.
From the flow list, use the New Flow button.
Choose Record Triggered Flow.
Click Create.
Select your Object
Choose the Waitlist Object from the dropdown.
Trigger the flow when a record is created.
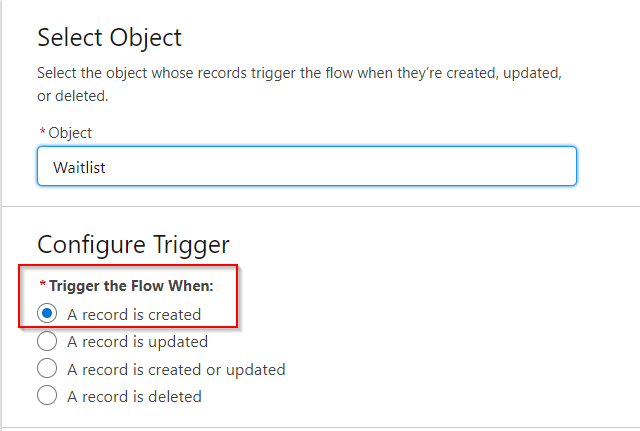
Figure 4. Screenshot of the radio button to select
Set Entry Conditionsto check that the Waitlist record created is NOT by the staff user profile.
Select the Formula Evaluates to True option from the Condition Requirements drop-down
Set the Condition using a formula
Condition 1 = NOT(ISBLANK({!$Record.nu__Email__c})) && ({!$Record.Owner:User.Profile.Name} != 'Nimble AMS Standard')
NOT(ISBLANK({!$Record.nu__Email__c})) - Checks that the email field is not blank.
({!$Record.Owner:User.Profile.Name} != 'Nimble AMS Standard') - Checks that the waitlist was not created by a staff User.
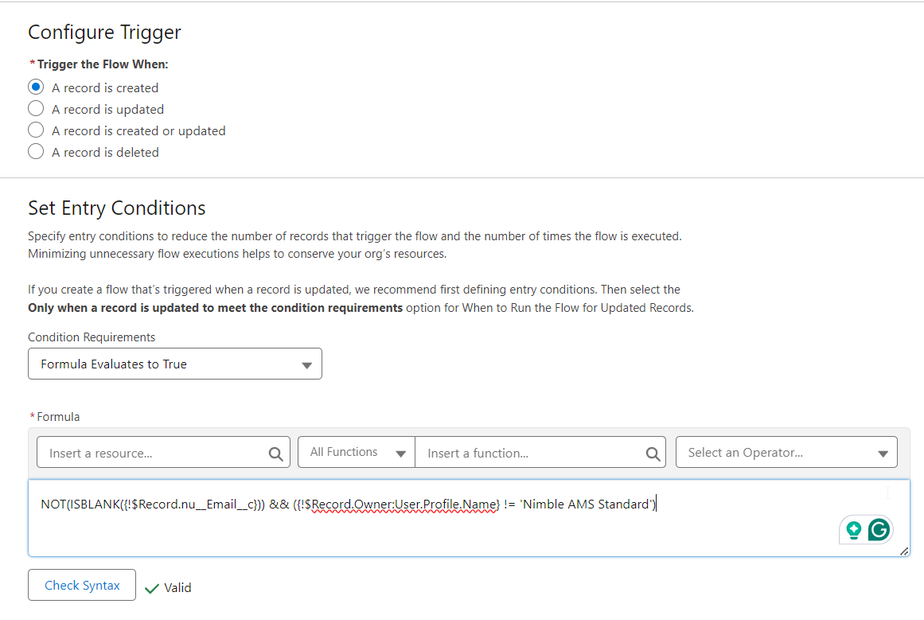
Figure 5. Screenshot of Entry Conditions
Add an Action Element to the flow
Search for the Send Emails invocable action apex-NU__SendEmailInvAct
Label: <ENTER_LABEL>
Set Input Values:
Toggle on Contact Id:
{!$Record.NU__Account__r.PersonContactId}Toggle on Org Wide Email Address Id: Enter your Org Wide Email Address Id.
Toggle on Template Id: Enter the Template ID of the email template that you created in the above steps.
Toggle on Template Related Record Id:
{!$Record.Id}Click Done
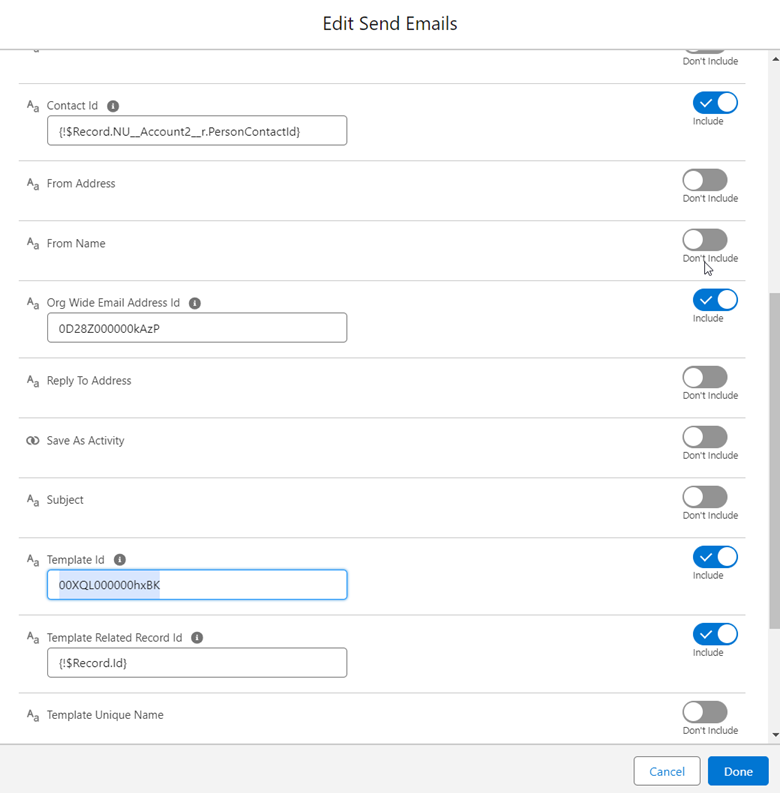
Figure 6. Screenshot of Apex Values
Save the Flow.
Recipe Results
After Association members successfully join an Event Waitlist, they will receive an email notification to the address that they specified.
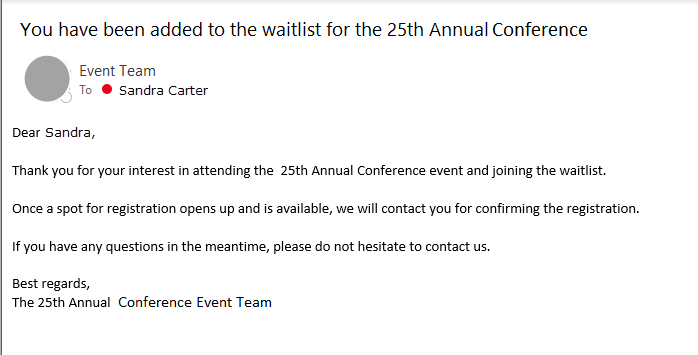
Figure 7. Screenshot example of how the email notification will read