Administrators can create an entity to track financial transactions separately from other entities your association manages.
In the tab bar, click App Launcher, or in Salesforce Classic, click Nimble AMS, Staff View, Button, All Tabs.
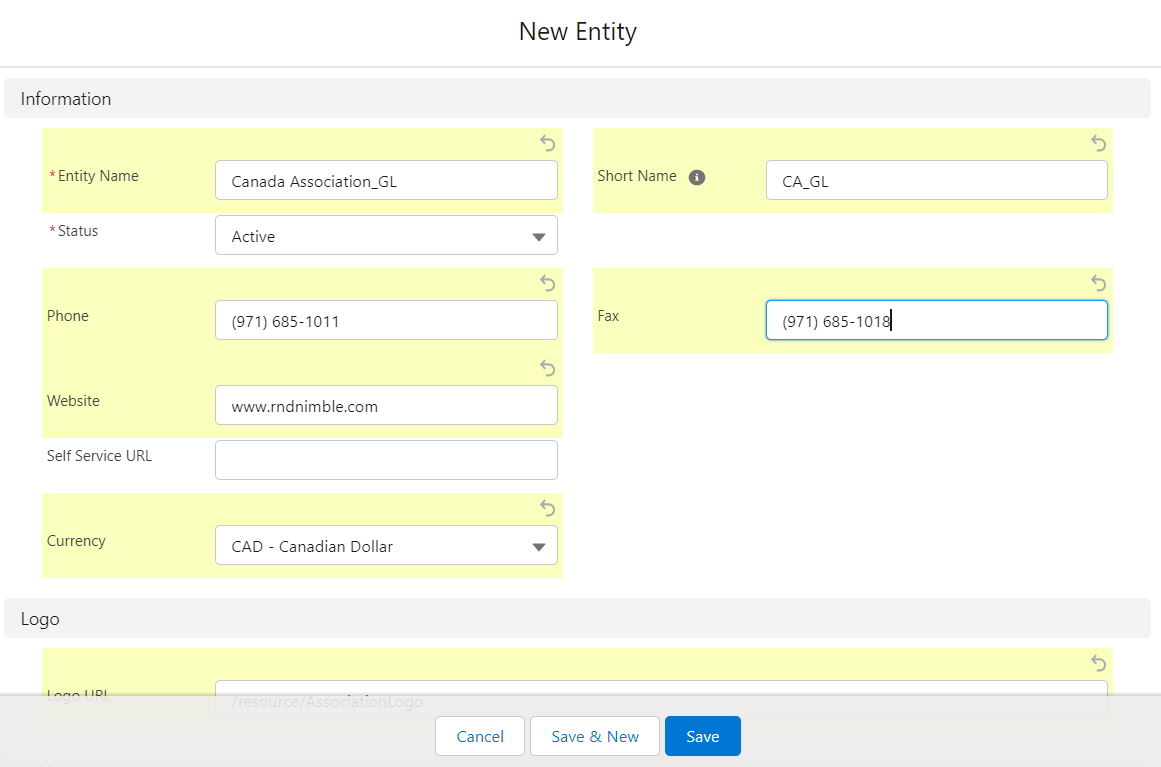
Click Entities.
Click New.
Enter information:
In Entity Name, enter the full name of the entity.
In Status, select Active.
In Short Name, enter the acronym of the entity.
In Phone, enter the phone number of the entity.
In Fax, enter the fax number of the entity.
In Website, enter the path to the entity's website.
If all bill me enabled products should be purchasable using Bill Me in Community Hub, select Bill Me Enabled.
Add a logo:
In Logo URL, enter the path to a publicly accessible image to be used as the logo.
We recommend you add this image as a public static resource (external) and ensure the image dimensions are no larger than 300px × 50px for visibility.
If you want staff to have access to the logo file, then your organization may choose to use the Document object. More information on how to upload or replace a document can be found in Salesforce help.
Enter address detail:
In Street, enter the street address of the entity.
In City, enter the city of the entity.
In State, enter the state of the entity.
In Postal Code, enter the postal code of the entity. This field is required to use Level 2 or Level 2 and Level 3 credit card processing for this entity.
In Country, enter the country of the entity.
If setting up remittance detail:
In Remittence Street, enter the street address for the invoice remittance slip.
In Remittence City, enter the city for the invoice remittance slip.
In Remittence State, enter the state for the invoice remittance slip.
In Remittence Postal Code, enter the postal code for the invoice remittance slip.
In Remittence Country, enter the country for the invoice remittance slip.
Select Remittence Enabled to enable the remittance text to display on an invoice when the order has an outstanding balance.
In Remittence Text, add any additional text to display on the invoice remittance slip.
Ship From Fields | Advanced Taxation
As of Nimble AMS Winter '20 release, in the Shipment section, apart from the already existing field Ship From Postal Code, four fields have been added, as given below:
Ship From Street
Ship From City
Ship from State
Ship From Country
These will be useful in calculating tax as selling location is taken into account for tax calculations. This is because tax regulations and hence amount may vary in different locations. For more details, see Advanced Taxation.
Enter accounting detail:
If your organization has a tax free status, in Tax ID, add the entity tax id.
In Batch Export Configuration, enter the name of the configuration, click Nimble AMS, Staff View, Button, Lookup, and select the configuration.
In Invoice Term, enter the number of days used to calculate the invoice due date.
Enter Community Hub detail:
Payment URL (Order) and Payment URL (Cart) are used for express payment.
Checkout Page is used for donations in Community Hub.
In Download Proxy Page, enter the relative path of the page that validates user access to downloadable content. For example: nc__download.
If you only have one Community Hub, in Community Hub URL, enter the community URL for that Community Hub.
In Email Service From Address, enter the From email address to use when emails are sent via a third party.
In Email Service From Name, enter the display/friendly name to use for the Email Service From Address.
Optionally, in Currency, select the currency value this entity is created for.
Note
If you have enabled Salesforce multi-currency, Salesforce introduces the Currency field on all object layouts within your org.
While creating a new Entity record make sure to select the right Currency field value before saving the record. Because, once the record is saved, you will not be allowed to edit the value of the Currency field.
Show Me An Image
Click Save.
JavaScript errors detected
Please note, these errors can depend on your browser setup.
If this problem persists, please contact our support.