Staff can create membership products to store price and description information. Membership products are typically created when Nimble AMS is set up for your association and are only modified as needed.
Create a Membership Product
In the tab bar, click App Launcher, or in Salesforce Classic, click Nimble AMS, Staff View, Button, All Tabs.
Click Products.
Click New.
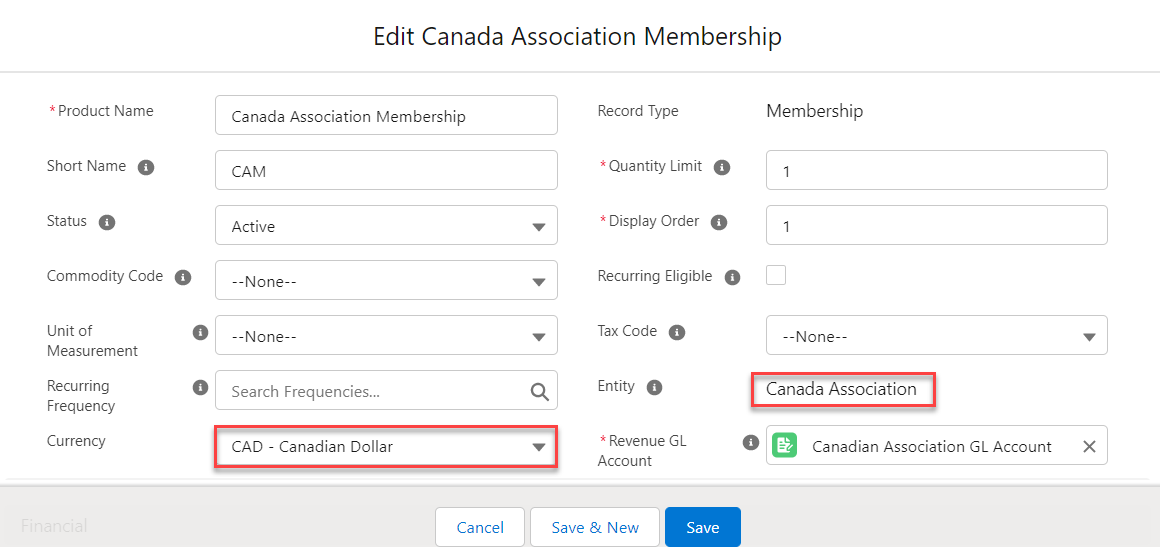
In Record Type of new record, select Membership.
Click Continue.
In Product Name, enter a name to assign to the product. This name displays in the order process and on invoices.
In Short Name, enter the short name of the product. The Short Name is used by staff to search for the product or in analytics. This field is required if your association uses Level 2 and Level 3 credit card processing.
In Short Description, enter the short description of the product.
If you wish to allow auto-renew of Membership product, select Recurring Eligible.
In Recurring Frequency, select the defined frequencies for auto-renewing of Membership product.
In Description, enter the description of the product. This may appear on an invoice or order confirmation, as well as in Community Hub.
Status is populated.
You do not need to change Quantity Limit, as it is not applicable to membership products.
In Display Order, enter a number to signify where in the list of products this membership product should be displayed in the Staff View order process and in Community Hub. The lower the number, the higher the membership product displays on the list of products.
The number should be 0 - 999.
Consider spacing out your numbers to accommodate future changes in products.
If your association uses Level 2 and Level 3 credit card processing, in Commodity Code, select the commodity code used to classify the product. Learn more (external) about what each code means.
If your association uses Level 2 and Level 3 credit card processing, Unit Of Measurement is populated. Check with your administrator to see if you need to select a different value.
Tax Code
A staff user must select a value from the Tax Codedrop down on Product page to define which tax will apply to the Membership product, if the membership prod is taxable. See Advanced Taxation to learn more. In Avalara, a third party tax computation portal, the administrator can map additional Tax Codes with Item Codes. SeeAdding Tax Codesto learn more.
In List Price, enter the price that constituents pay for this product when no special pricing is applied.
In Revenue GL Account, enter the GL Account to which revenue for this product is recorded. Click Nimble AMS, Staff View, Button, Lookup and select the GL account.
In Deferred Revenue Method, enter the deferred revenue method for the product. Click Nimble AMS, Staff View, Button, Lookup and select the deferred revenue method.
Select Self Service Enabled to enable a product for purchase on Community Hub.
In Entity, enter the name of the entity associated with the product. Click Nimble AMS, Staff View, Button, Lookup and select the entity.
Optionally, inCurrency,select the right currency value.
Note
If you have enabled Salesforce multi-currency, Salesforce introduces theCurrencyfield on all object layouts within your org.
While creating a new Membership Product record make sure to select the Currency field value that matchesthe Currency field value on the linked Entity record. If theCurrencyfield value of Entityand MembershipProduct does not match, then it throws an error.
Also, once the record is saved, you will not be allowed to edit the value of theCurrencyfield.
Show Me An Image
Click Save.
Edit a Membership Product
In the tab bar, click App Launcher, or in Salesforce Classic, click Nimble AMS, Staff View, Button, All Tabs.
Click Products.
Select a list view—like Membership—and click Go!
Click Edit next to the Product you want to modify and make desired changes.
Entity cannot be changed.
Click Save.
JavaScript errors detected
Please note, these errors can depend on your browser setup.
If this problem persists, please contact our support.