You've exposed a lot of portals and web apps to your constituents: Community Hub, your main website, and perhaps a job board or a learning management system like Freestone LMS or Crowd Wisdom LMS. It's not exactly a smooth experience if they have to log in to all those sites individually.
How about they log in once and then they are securely logged in everywhere? That's the beauty of Single Sign-On (SSO).
Community Hub can be the place to sign in, called the "identity provider" for all of your constituent-facing portals and web apps. So let's say they're on your public website and they click to log in. with SSO configured, they get passed to Community Hub, they enter their Community Hub login credentials. After successfully logging in, then they get passed right back to your website. They are now logged in to your website and Community Hub! Since Nimble AMS is built on Salesforce, this is accomplished using the power of OpenId and OAuth 2.
This guides a Nimble AMS admin through the setup steps to configure Nimble AMS so that a fictional LMS vendor—Brightmind LMS—can authenticate users via Community Hub. It also explains the followup steps the Nimble AMS admin needs to do, such as sending information to Brightmind so they can update their login link and configure the rest of the SSO from their side.
Community Hub must be active and accessible to complete these steps.
Create a Connected App
Each vendor website/application that wants to integrate with Nimble AMS SSO must have its own dedicated app configured in Nimble AMS, called a connected app. It informs Nimble AMS of this new authentication entry point.
-
In Setup, go to the App Manager and click New Connected App
In Setup, go to Apps, and click New in the Connected Apps list.
-
Configure the following fields for the connected app.
Field
Example Value
Description
Connected App NameBrightmind LMSThe name of both the vendor and the system.
It helps to specify the system because a single vendor can integrate multiple systems to Nimble AMS.
API NameBrightmindLMSThe
Connected App Namein Pascal case. Learn more about Pascal case in Component Design Guidelines.Contact Emailmark.thomas@brightmind.comThe email address of the individual or team responsible for maintaining the integration from the vendor's side.
DescriptionSingle Sign-On integration with the Brightmind learning management system where users earn credits toward certification.A brief explanation of the vendor and system.
Enable OAuth SettingsTRUEDetermines what data can be passed from Nimble AMS to the vendor's system.
Callback URLhttps://isen.brightmind.com/account/gateway
A special URL on the vendor's side that Nimble AMS sends the constituent back to after successfully authenticating. Typically, the URL automatically handles the information sent to them from Nimble AMS in order to complete the login process on their side. The vendor needs to provide this URL.
If you don't have this yet, temporarily use:
https://openidconnect.herokuapp.com/callback
OAuth 2 requires that SSL be used, so the URL must be "https" (not "http").
The user will NOT be directed to another site unless the vendor includes the following parameter in their url:
"returl="For example:
https://staging-jumpstart-1628d79e021.cs66.force.com/communityhub/NC__Login?retURL=www.google.com
Selected OAuth ScopesSelect the following:
– Access your basic information (id, profile, email, address, phone)– Allow access to your unique identifier (openid)Each of these is a set of specific permissions that determines what data the vendor's system is permitted to receive from Nimble AMS.
These are the minimum scopes needed for SSO with Nimble AMS. Some integrations may need more data, but we'll explain that in the section around including custom fields.
Manage the Connected App
Next, you need to update permissions for the app, so constituents can actually use it. This is configured on a separate page in Setup.
-
In Setup, go to Manage Connected Apps and click to Edit the connected app you just created.
In Setup, go to Connected Apps, and click to Edit the connected app you just created.
-
Change
Permitted UserstoAdmin approved users are pre-authorized.This makes the authorization process for constituents smoother by bypassing an authorization prompt the first time they use Single Sign-On.
-
Ensure
Refresh Token PolicyhasImmediately expire refresh tokenselected. -
After saving the page, open the app by clicking its name, go to the Profiles related list and click Manage Profiles.
-
Select the Community Hub Login User and Nimble AMS Integration profiles.
Passing Additional Data to the Vendor's System with Custom Attributes
The OpenId scope you chose when creating the connected app permits Nimble AMS to respond to the vendor's system with basic user information stored in Nimble AMS, such as the user's name, email, user ID, and address.
Sometimes, a vendor's system needs more information from Nimble AMS. This is where "custom attributes" come in, which are additional data that Nimble AMS sends to the vendor's system in the callback response.
A common scenario is the vendor's system needs data stored on the user's account record, such as a member ID or their member status. For example, Brightmind LMS offers members-only courses and they need to know from Nimble AMS if the account has an active membership.
In addition, when you create an Auth. Provider record you will receive the Social Sign-On Url to log into the org, so that wouldn't work to log into Community Hub. Once you have the AuthProvider instance of the record you want to get the url for, you can get the equivalent Community Hub Single Sign-On Url the following way:
String communityHubSingleSignOnUrl = Auth.AuthConfiguration.getAuthProviderSsoUrl(communityHubUrl, startUrl);
As you can see, you are able to specify the startUrl (where you want your users to be redirected to upon successful login) when retrieving the Single Sign-On Url.
Send Non-Account Data
Nimble AMS can easily send non-basic user fields, custom labels, profile data, information about your association that's specified in Company Information, and more. This purely uses Salesforce platform functionality.
Send Account Data
While custom attributes have direct access to the user record, they don't have direct access to the account record. Remember, the user and the account are two different records.
However, with Nimble AMS, you are able to keep specific fields in sync between an account record and its corresponding user record. You can then use custom attributes to pass the data to the vendor's system, since it's now on the user record.
Let's say you want to pass the Member field to Brightmind LMS. To do this—and we'll walk you through each step—you:
-
Create a complementary field on the user record named
Member. -
Create a sync between the account's
Memberfield and the user'sMemberfield. -
Include the user's
Memberfield as a custom attribute in the Brightmind LMS connected app. -
Add an OAuth Scope to the Connected App
 Step 1 of 4: Create a New Field on the User Object
-
In Setup's Object Manager, view the Account field you want to pass to the vendor's system, and make a note of the following:
-
Field Label(Ex:Member) -
Field Name(Ex:Member) -
Data Type(Ex:Text)
-
-
Create a new field on the User object that has the same
Field LabelandField Name. It should also have the sameData Typeas the Account field, unless the Account field'sData TypeisFormula, in which case it should match the Account field'sFormula Return Type. This is because the sync needs to update the User field, and it can't do that if you create a formula field.-
For example, the account's
Memberfield has aData TypeofFormulaand aFormula Return TypeofText, so create a User field with aData TypeofText.
-
Step 2 of 4: Create a Sync Between the Account Field and User Field using the Field Mapping Custom Setting
Contact Nimble AMS Support to complete these steps.
Nimble AMS Support will need to know the names of the account field and the user field you want to sync.
-
From Community Hub Settings, create a new Field Mapping record:
Field
Example Value
Description
NameAccount Member / User MemberWe recommend naming it with the following format (if it doesn't fit, use the field labels or abbreviate words):
[Record Source][Source Field] / [Destination Source] [Destination Field]Field on the SourceNU__Member__cThe full API Name of the account field to sync with.
Source Linking FieldNU__PersonContact__cThe lookup field on the source object (Account) that relates to the destination object (User). For User-Account syncing, always use: NU__PersonContact__c
Source ObjectAccountFor User-Account syncing, always use:
AccountDestination ObjectUserFor User-Account syncing, always use:
UserDestination FieldMember__cThe full API Name of the user field you created.
Destination Linking FieldContactIdThe lookup field on the destination object (User) that relates to the source object (Account). For User-Account syncing, always use: ContactId
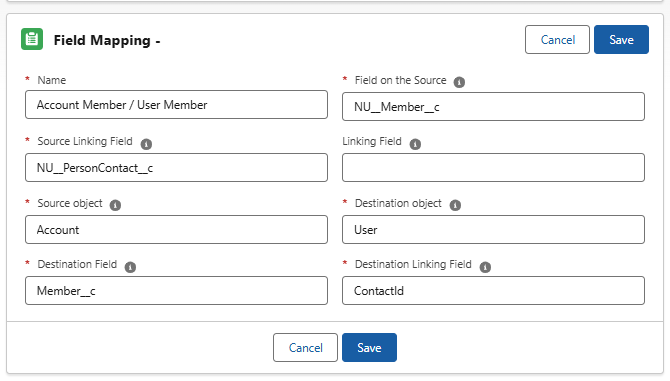
Figure 1. The screenshot shows the field mapping window
It is a bi-directional field mapping so long as Account = source and User = destination. Use the screen capture above. Field mapping is run on the NU Account trigger and cannot be turned off independently using NU.Disable Triggers.
If the Account field is a formula, then changes to the User field cannot sync back to the account field. When a user field is synced to an account formula field, staff should not be changing the user field, since the account field, as a formula field, is the source of truth.
-
Manually trigger the sync for existing accounts by running the following job:
Database.executeBatch(new NC.SyncAllRecordJob());
The Field Mapping custom setting runs on the NU.Account trigger and therefore cannot be independently disabled via Disable Nimble AMS Triggers.
Step 3 of 4: Create a Custom Attribute for the User Field
This ensures the user field is included with the other data in the callback to the vendor's system.
-
In Setup, go to Manage Connected Apps and click to the name of the connected app.
In Setup, go to Connected Apps, and click the name of the connected app.
Do not add the custom attribute via the App Manager page (or Apps page in Classic). While there is a Custom Attributes related list on that page, they do not get passed to to the vendor's system.
-
In the Custom Attributes related list, click to add a new custom attribute.
-
Enter an
Attribute Keywhich is the name of the field that the vendor will see in the callback Ex:MemberIt can reduce confusion from the perspective of Nimble AMS to name this key the same as the user field name (Ex:
Member) but sometimes vendors expect a certain key name because it makes more sense in their system (Ex:Is Member).
-
Enter an
Attribute Valuethat references the user field you added. Ex:$User.Member__cUse Insert Field to ensure the right syntax is used. User fields are stored in the $User collection.
Step 4 of 4: Add an OAuth Scope to the Connected App
We need to give the connected app permission to access this additional data.
-
In Setup, go to the App Manager and click to edit your connected app.
In Setup, go to Apps, and click to edit your connected app.
-
In Selected OAuth Scopes, select
Access and manage your data (api).
Changing the Logout to Redirect to Another System
When it comes to logging out when Nimble AMS is the identity provider, the constituent is always directed to Nimble AMS' JavaServer Page to handle the logout, which also logs them out of any vendor systems using SSO. This JavaServer Page itself doesn't display any content to the user.
The JavaServer Page is located on your Community Hub site at {CommunityHubSiteUrl}/secur/logout.jsp
After the logout finishes, Nimble AMS sends the constituent, by default, to the Community Hub login page. Alternatively, you can configure Nimble AMS to send the constituent somewhere else after logout.
A common practice is to send them to your association's public website (content management system).
-
Follow the steps to Redirect Members to a Custom URL on Logout (external).
Test Your Configuration
Salesforce provides an OpenId Tester that confirms you configured everything correctly. This can be tested prior to contacting the vendor to configure and test the SSO on their end.
You should test in a private or incognito browser session. Otherwise, the tester tries to use your active Salesforce sessions, which can throw unexpected errors.
-
Create a test Community Hub user that the vendor can use to test the integration. Learn how to Create a Community Hub User.
-
Go to https://openidconnect.herokuapp.com/
-
Enter the following information:
Field
Example Value
Description
Login Host
https://isen.force.com/communityhub
Your Community Hub Site URL, found in All Communities in Setup.
Highlight the URL's text and copy the text itself, not the underlying hyperlink.
Client ID
3MVG99OxTyEMCQ3gXZV31lysX3RQP4.VF4EVzlMsVbxF83H9JWZ0WcjWvGlAU7BPJFZBSyBGPiGyHhojZ6jf2
The
Consumer Keyfor your connected app, from the connected app's page in App Manager.Client Secret
6322190766332158712
The
Consumer Secretfor your connected app, from the connected app's page in App Manager.
-
Proceed to the next page, which is the login host you specified (Community Hub in this case).
-
Log in as the test Community Hub user you created. Once you are authenticated, you are sent back to the OpenId Tester.
-
Continue to the next couple pages. Notice how you can see the responses from Nimble AMS, which is the information it sends to the vendor's system.
If you get to the final step and see a large response message with the user's information, you have successfully configured the connected app!
Share Information With the Vendor
With the connected app configured correctly, you can finally provide the vendor with the information they need to configure the integration on their side.
Here's a template you can copy and paste into your message to the vendor, replacing the text in red.
For security purposes, this information should be shared privately with the vendor.
I have configured Nimble AMS for Single Sign-On with Vendor.
Here is the info your team needs:
-
Community Hub URL: https://isen.force.com/communityhub
-
Consumer Key: 3MVG99OxTyEMCQ3gXZV31lysX3RQP4.VF4EVzlMsVbxF83H9JWZ0WcjWvGlAU7BPJFZBSyBGPiGyHhojZ6jf2
-
Consumer Secret: 6322190766332158712
-
Test User: test@isen.org / nimble123
Can your team let me know what the Callback URL should be?
Once I update the Callback URL and your system receives a response from Nimble AMS, please let me know if you need additional data in the response.
Finding the information in bold was covered earlier in this page in the section on testing Single Sign-On.
As the template alludes to, you'll want to return to your connected app and add the Callback URL once they provide you with that. You may also need to provide additional custom fields in the response or configure the logout url to go their org. Aside from that, you've successfully configured Nimble AMS for Single Sign-On!
Related Links
Authenticate Apps with OAuth (external)
Configure SAML Settings for Single Sign-On (external)
Configure an OpenID Connect Authentication Provider (external)
View and Edit Single Sign-On Settings (external)
Digging Deeper into OAuth 2.0 in Salesforce (external)