Enablement and Configuration for Product Variants
Overview
This page contains details of how to enable and configure Product Variants for your association. To learn more about the benefits of using Product Variants visit Product Variants.
Prerequisites
You must have set up the Enablement Steps - Lightning Store using Community Builder and the new Lightning Web Components to use the Product Variants feature.
Enablement Steps
Assign Page Layouts
Page Layout - Parent Product
Page Layout | Parent Product
If any fields or tab are not visible on the Parent Product, ensure that the page layout Nimble AMS Product Record Page - Parent Product is assigned to the Parent product object in Object Manager.
Ensure the following check boxes and related lists are available on the following page layouts
In Staff View, verify that the following fields and related lists exist on the Parent Product page layout.
- Related List for Child Products.
- Self Service Enabled field.
In Staff View, verify that the following fields and related lists exist on the Product Page Layout for the product being sold.
- Self Service Enabled field.
- Cannot Be Sold Separately field.
- Related List for Parent Products.
- Related List for Attributes.
In Staff View, verify the following related list exists on the Lightning Record Page Layout for the following pages.
Related List for Child Products
- Parent Product Lightning Page.
- Product Lightning Page.
- Merchandise Product Lightning Page.
The Self Service Enabled checkbox needs to be checked for any product the administrator wants to show in the store through a Product Variant or on its own.
The Cannot Be Sold Separately checkbox should be selected if the child product should not appear on its own in the Lightning Store and instead will surface as a Product Variant or attribute when a user clicks on the Parent Product and the associated Lightning Product Details Page appears.
Configuration: How to Set up Product Variants
Product Variants is enabled by default in the Lightning Store. The following section will explain how to configure products to make use of the Product Variant feature in the Lightning Store.
Suggested Workflow
Suggested Workflow
Create Parent Products.
Select Products to be Child Products of the Parent Product.
Either create attributes then associate them with the Child Products, or use existing attributes and associate them with the Child Products.
Link the Child Products to Parent Products.
Result: Parent Products should show up in the Lightning Store with the correct product variants and attributes displaying after a user clicks on the Parent Product.
1. Create a Parent Product using the Parent Product Record Type
Staff administrators can create a parent product to allow for multiple child products having different variations, shown in the Lightning Store.
A new record type Parent Product can be selected to create a parent product.
The Parent product itself does not have any inventory, price, or size/color options. Its displayed values are displayed based on the child products linked to it.
If a child has been selected as default the attributes of that child will be displayed by default.
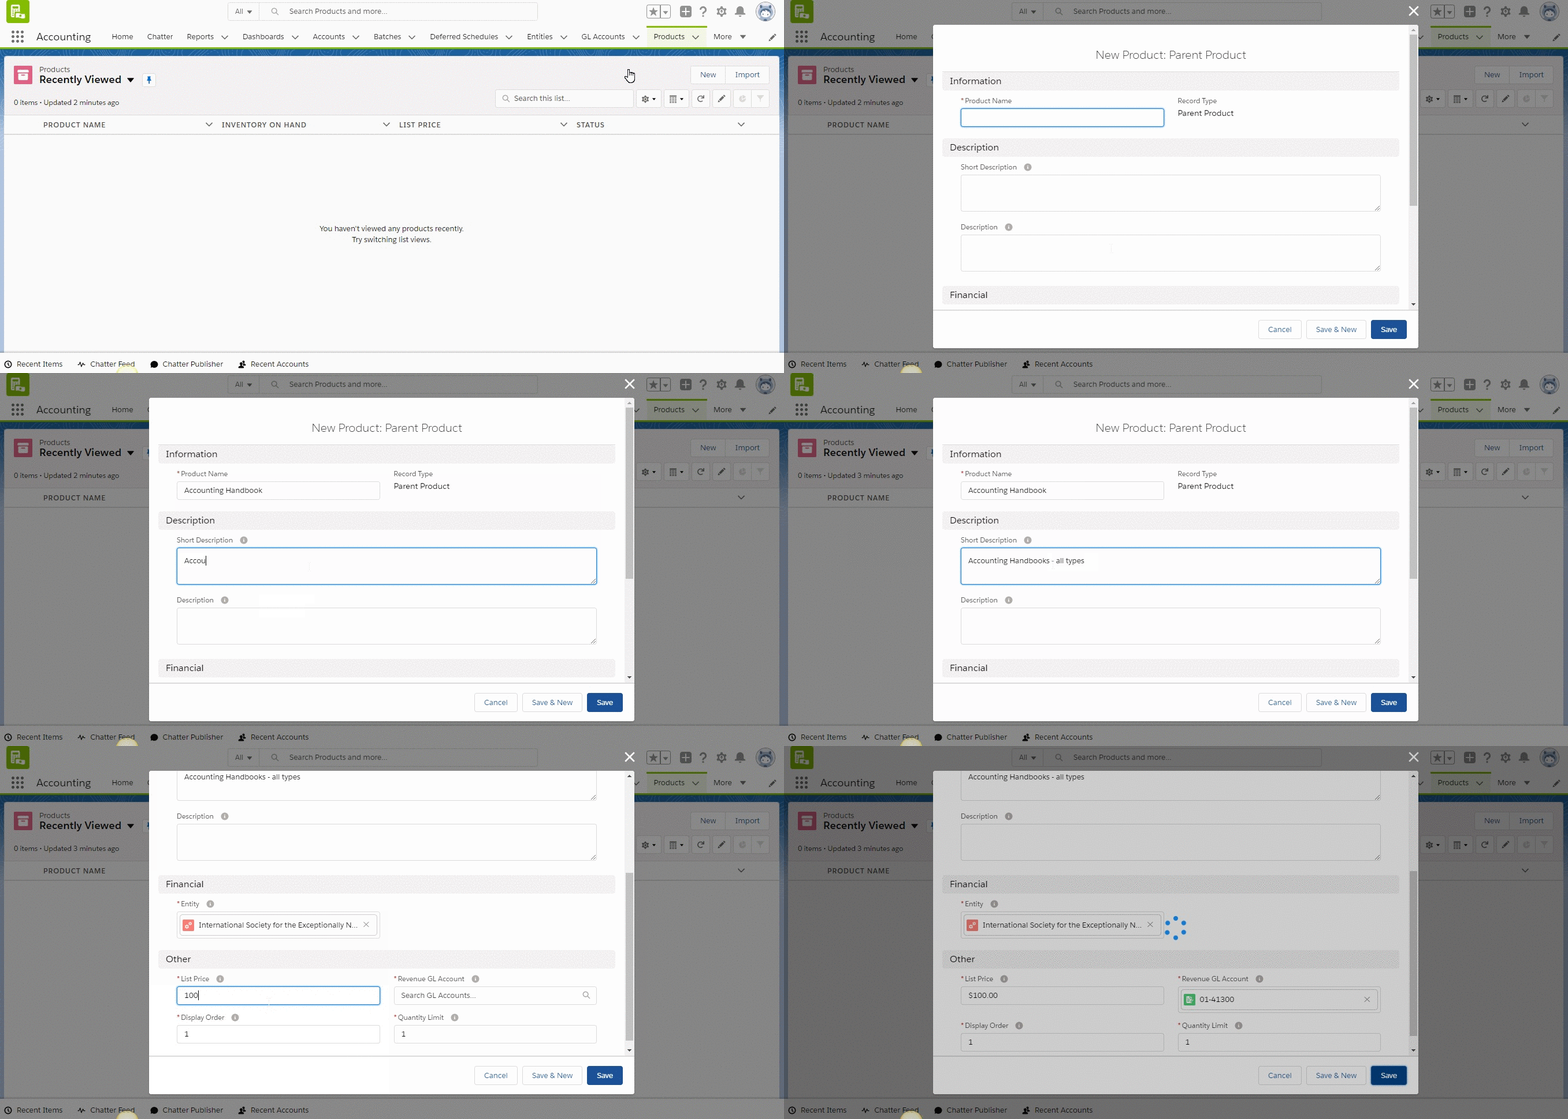
Steps to create a parent product in Staff View:
In the tab bar, click App Launcher or in Salesforce Classic, click + .
Click Products.
Click New.
In
Record Type of new record, selectParent product.Click Continue.
In
Product Name, enter a name to assign to the product.In
Short Description, enter the short description of the product.In
Description, this is a required field for the Product Object as a whole and should be completed with a default value. However you can choose to enter the description of the product which can include summary information. This will not show up in the Lightning Store view. The product description displayed on the product details page will update depending on the child product selected via the attribute toggles. If a selected child product does not have a description, the parents description will display.In
Entity, enter the name of the entity associated with the product. Click and select the entity.In
Self Service Enabled, select the checkbox to enable the product for Lightning Store.In
List Price, no change is required. The Parent Product is required to have a list price, however it will never be displayed in the Lightning Store. If you enter a value, it will have no impact on the product.In
Revenue GL Account, it is required to populate a GL account. You can enter any any GL account (that is associated with the chosen entity). This will not have any effect as the parent product GL account will not be used. Only the GL account of the child product purchased will be used.In
Display Order, enter a number to signify where in the list of products this product should be displayed in the Staff View order process and in the Lightning Store. The lower the number, the higher the product displays on the list of products. The number should be 0-999.Consider spacing out your numbers to accommodate future changes in products.
Quantity Limit:No change is required, a default value will be entered already. The Parent Product is required to have a Quantity Limit, however it will never be displayed in the Lightning Store. If you enter a value, it will have no impact on the product.Click Save.

Fig 1.1 Creating a Parent Product
2. Select Child Products and set attributes
What are Child Products?
Any product can be selected to be a child product to the Parent Product Record Type.
The term child product refers to the relationship between the Parent Product and a product.
A product link has been created to facilitate the link between a Parent Product and a product.
What are Attributes?
Attributes are used to differentiate the child products from each other in the Lightning Store under the Lightning Product Details Page for the Parent Product.
Child products may have one or multiple attributes.
As an example, say the staff creates a parent product called Book. Now they can create two or more child products like Hardback or Audiobook where Format is the attribute as shown in the table below.
Parent Product | Child Product | Attribute |
|---|---|---|
Book | Hardcover | Format |
Book | Audiobook | Format |
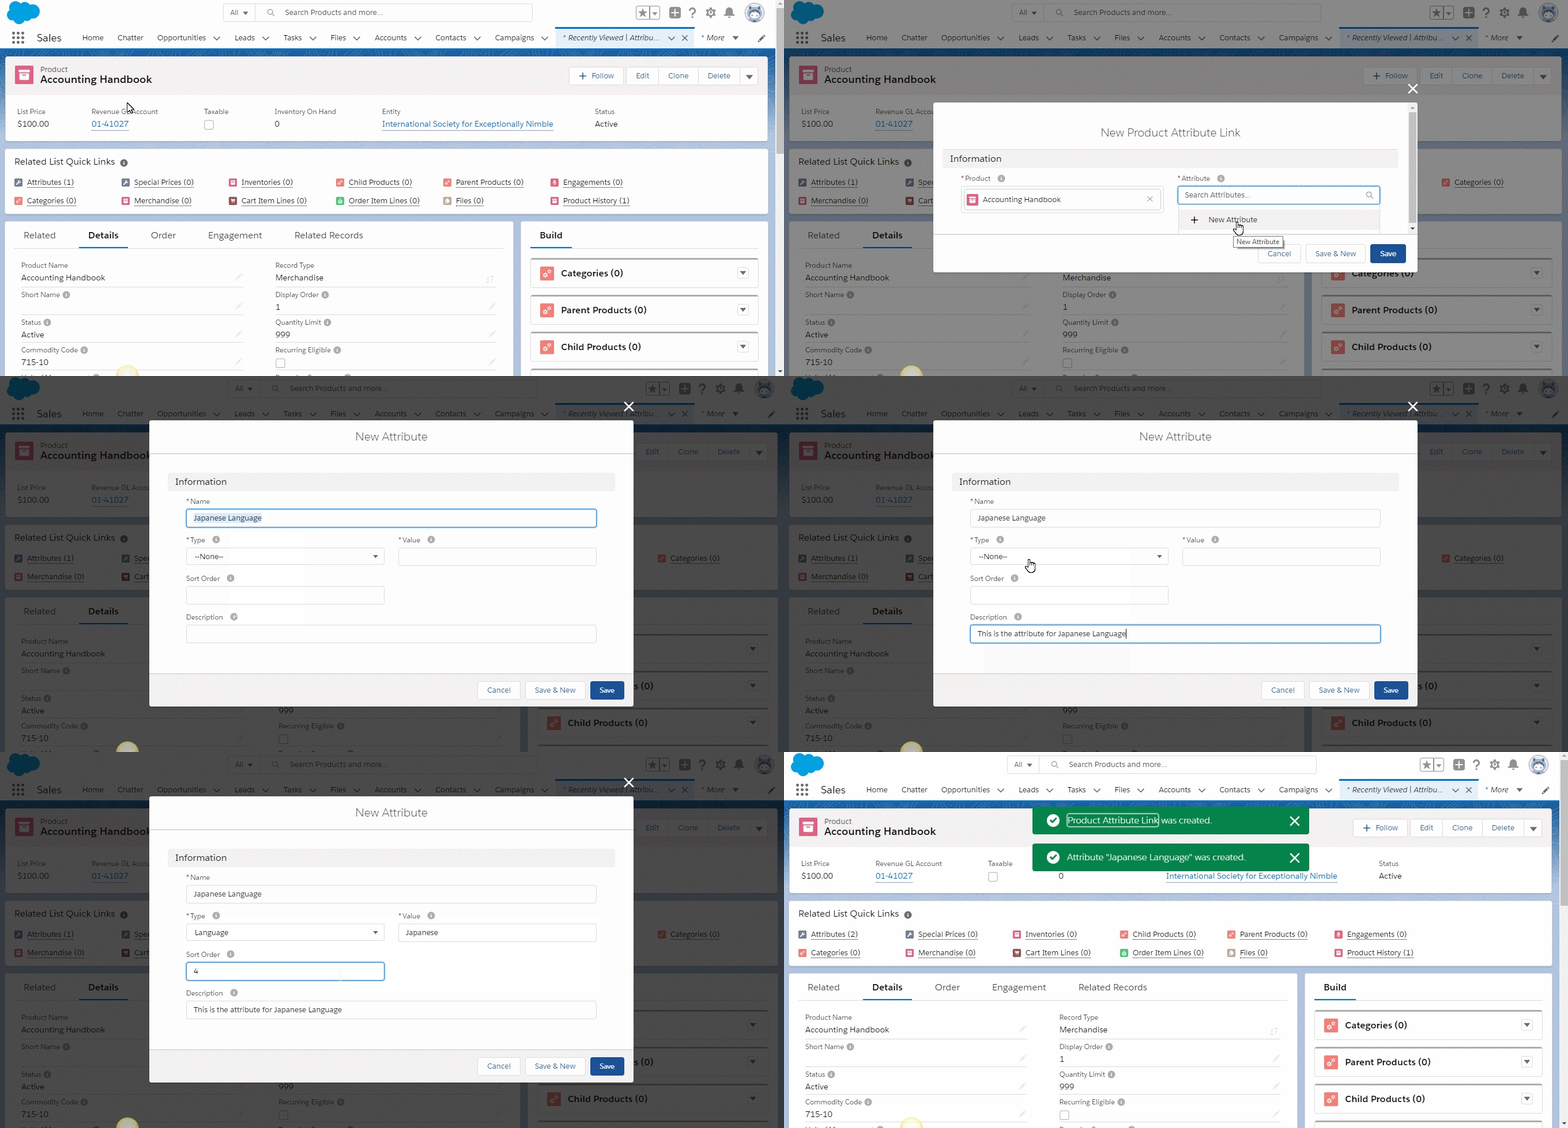
Steps to create a product attribute and link it to a child product:
You can also reuse an attribute that you have already created. If you are doing so, do not create a new attribute. Instead, search for it in the Attribute field and then click Save
- In the tab bar, click App Launcher, or in Salesforce Classic, click + .
- Enter
Productsin the search bar and select it. - Select a child product.
- Place the cursor on the Attributes related list and click New.
- In the New Attribute pop up, click on the field Attribute and then New Attribute.
- A modal called New Product Attribute Link will display. This is the junction object between an Attribute and a Product.
- In
Name, enter the name you wish to assign to the attribute record. - In
Type, select the type of product attribute. Type is the category of attribute. It’s used to group the attribute (for example, the category color). - In
value, give the value you wish to assign to the product attribute. This is the value that will appear to be selected by the user. - In
Sort Order, enter the display order you want for that attribute. - In
Description, if required you can enter the description of the attribute. - Click Save.
- On the pop up for Product Attribute Link, click Save.

Fig 1.2
Expected Result
The newly added attribute will be added to the list of attributes in the Attribute list of the product.
Set the Display Order and Plural Label of Attribute Types
You can set the Display Order in which you want to display the attributes types like color, language, etc. for a product on Lightning Store. Also, you can set the Plural Label of Attribute Types for products present in multiple variations, as an example for a product which comes in multiple formats, set Formats as the Plural Label. To do this, follow the below steps:- From Setup, enter
Custom Metadata Typesin the Quick Find box, then select Custom Metadata Types. Click Manage Records next to the Tag of Attribute Types.
Click Edit next to the attribute.
Enter the Display Order. The attribute type will be displayed on Lightning Store in this order. As an example, if you enter 1 for Attribute Type color, the color will be displayed first on the product in Lightning Store, and so on. The attribute type for which this field is left blank will be displayed last.
Enter value in Plural Label. This value will be displayed on Lightning Store if you have multiple variations of a product. As an example, if you enter
Formatsin Plural Value for the Attribute TypeFormat, Lightning Store will display 2 Formats for the product present in two formats.Update Page Layout
If Plural Label is not present on the page, edit the page layout of Attribute Type and drag and drop the Plural Label field from there.
3. Link a Child Product to its Parent Product
After creating a child product and its attributes, you need to link it to the parent product.
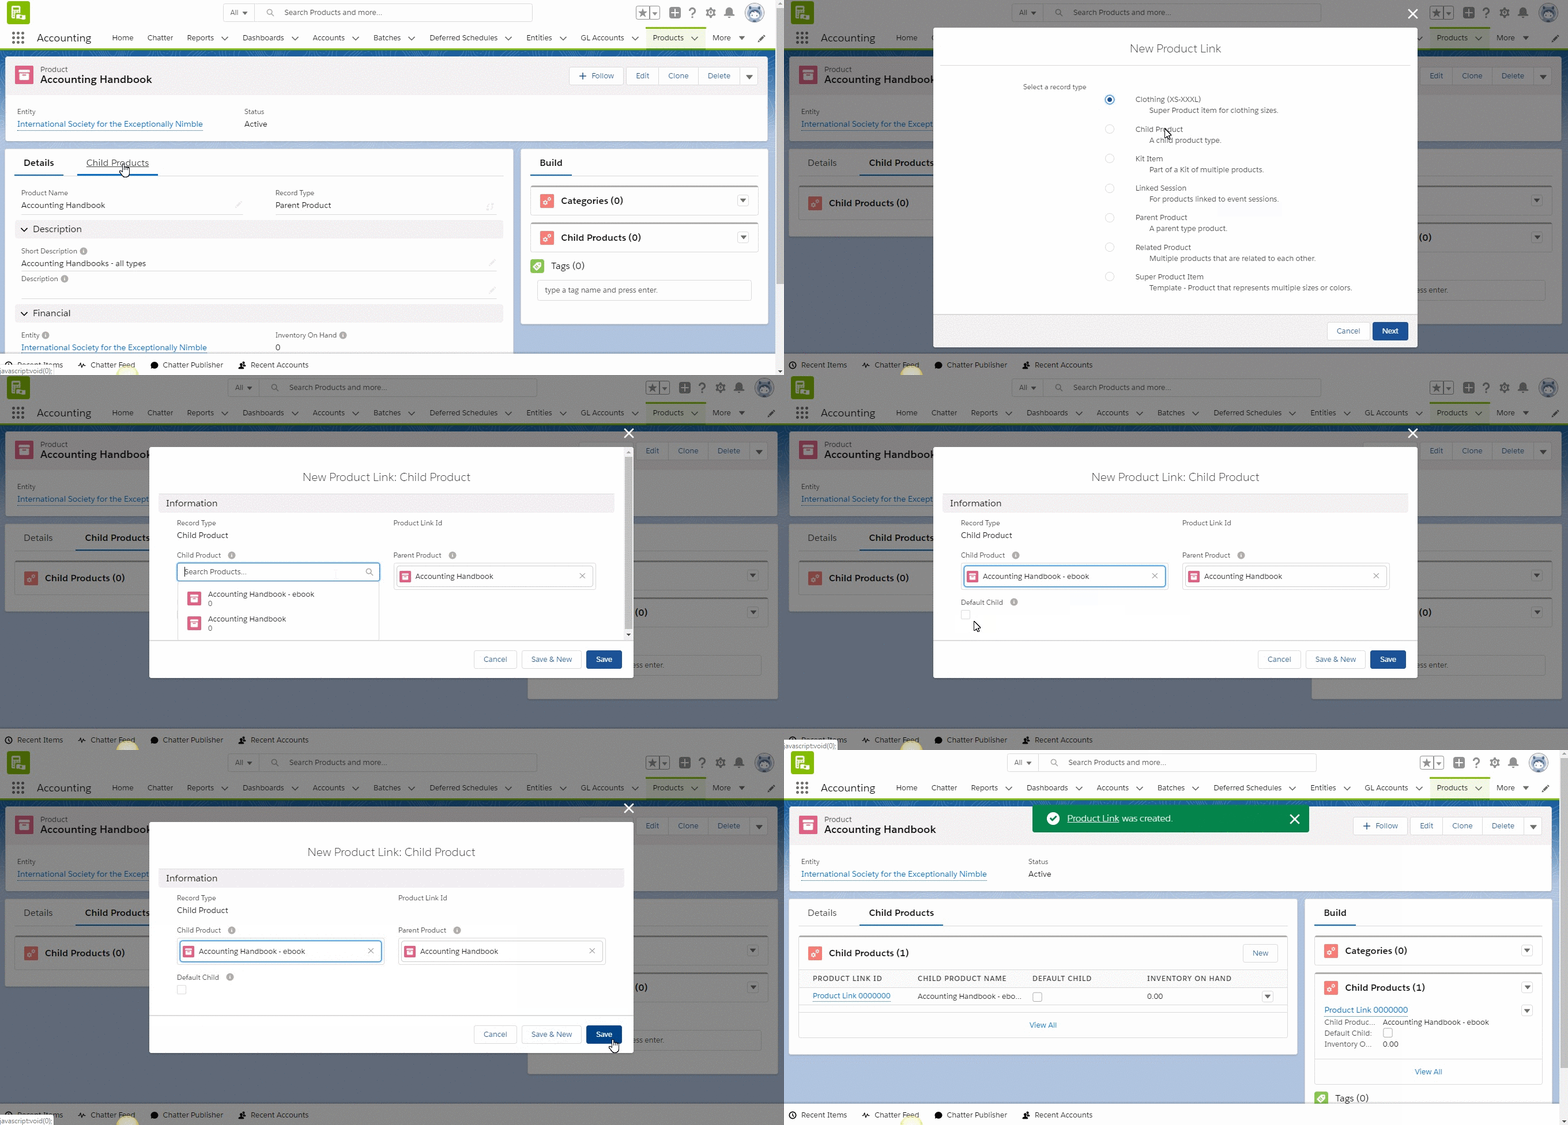
From the Parent Product find the Child Products list. Select “New”
In New Product Link select Child Product.
In Child Product, search for the product and select it.
If this is the default variant for the product family, select Default Child.
Click Save.
Expected Result
The child product will be linked to the parent product and appear in the child product related list.
Default Child Product
The default child product controls the default selection of attributes and the display of description and image when a user views the Product Details page.
What happens when no product is marked as default?
When there is no product marked as default, it selects one at random using standard Salesforce Logic.
Can you mark more than one product as default?
No, only one child product can be marked as the default for a parent product.

Fig 1.3 Creating a Product Link from a Parent Product to a Child Product
Expected Result
If all these steps have been followed, then Product Variants should have been set up successfully.
You should be able to view a parent product displayed in the Lightning Store grid, and selecting it will display the product details page and any attribute types assigned to its child products.
Customer Experience: Lightning Store
On the Lightning Store page, Nimble AMS has added the options available and price range for displayed parent products and a left panel for filtering products.
Also, on the Lightning Store Page, we have added a search bar so that the constituents can search for products by typing in part or the full name of the product.
When viewing a Product Details page, users can now select attribute options which will allow them to choose a specific product with ease.
On the My Checkout page, child products will be available to purchase. The product will also have a hyperlink to go back to the Product Details page. Customers can choose a child product which gets added to their cart and purchased. The child product will show on their order details as the purchased product.
Please note that the member experience within the Lightning Store will differ based on the version of the Product Details page that is available in your org. If your org is using the latest product details component from Experience Cloud Community Hub, they will see the revised UI. See Product Variants in the new Member Portal for further details on the newer functionality. If your org is using the Product Details version from Winter '20 release, your members will see the previous UI. See Product Variants for further details.
Customer Experience: Staff View
Nimble AMS has added a new
Record Typecalled the Parent Product within the Product object.We have created a new layout for the Parent Product page where you can add multiple child products and optionally mark one as the default child product to display on the Store page in the Lightning Store.
Two new objects called Attribute and Product Attribute Link have been added so that you can assign multiple attributes to child products to sell variations of the same product.
The Product Variants feature has no impact/change on the staff view order processor - it is only used to facilitate product selection in the Lightning Store.
We have added an Attribute tab to the merchandise product layout.
We have updated the product page layout with an additional field Cannot Be Sold Separately to allow users to use product variants.
Related Links
Product Variants in the new Member Portal
