Overview
This page will walk you through the steps needed to enable and configure Advanced Taxation to work with third-party tax service.
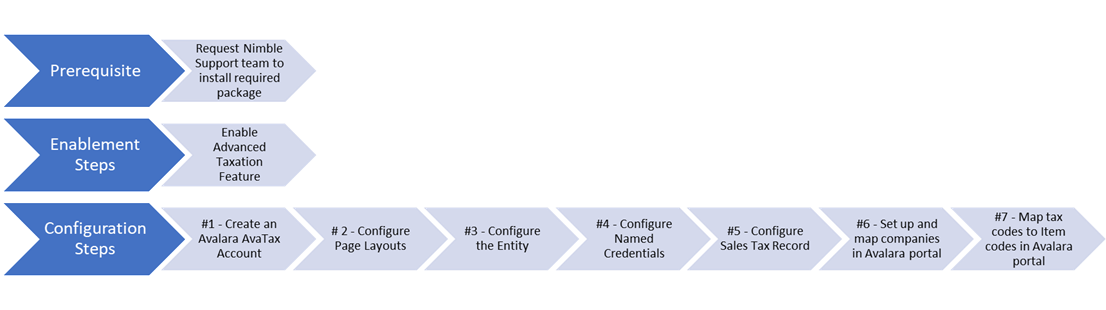
Prerequisites
-
Avalara AvaTax (third-party tax service) is required to utilize Advanced Taxation feature by Nimble AMS. Steps to get an account are given below in Configuration Steps section.
-
This feature requires an additional package installation. To have that performed, please reach out to Nimble AMS Support.
Enablement Steps
Follow these steps to enable the feature:
Enable Advanced Taxation Feature
Feature tag needs to be turned on to enable this feature. Administrator will need to follow the steps below:
-
From Setup, enter
Custom Metadata Typesin the Quick Find box, then selectCustom Metadata Types. -
Click Manage Records next to the Tag of Nimble AMS.
-
Click Edit next to External Sales Tax.
-
Select Is Active (Refer Fig 1.0).
-
Click Save.
The Calculate Tax button will now be available in Staff View on the
Order Processor
when ordering a product (Refer Fig 1.2). Please note that this functionality will work as expected after completing the Advanced Taxation configuration steps mentioned below.
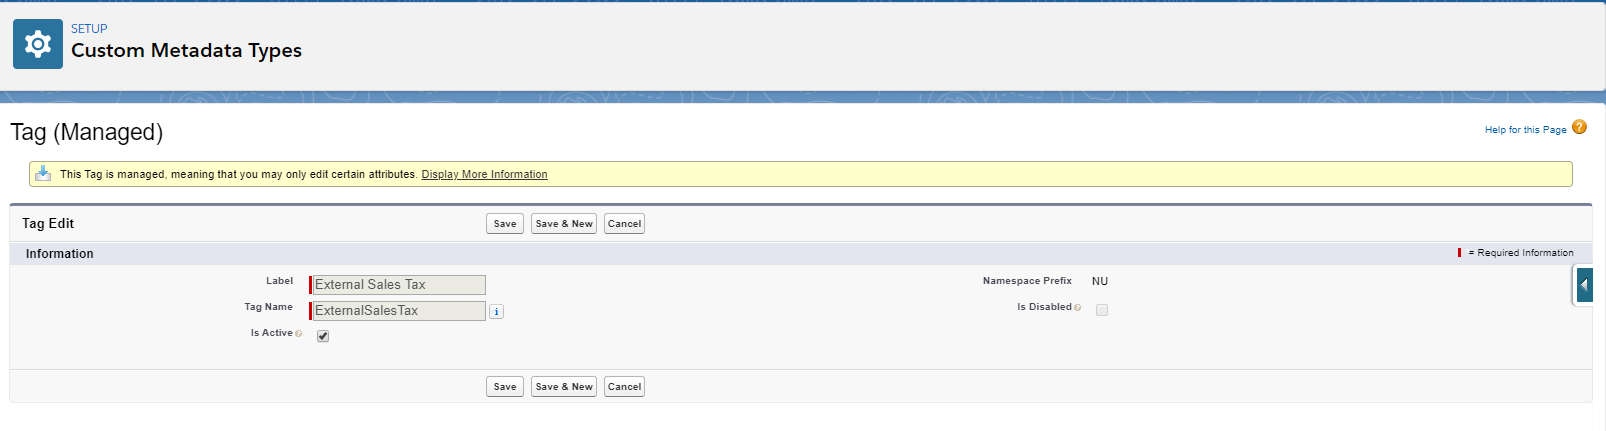
Fig 1.0 - Enabling the Feature Tag
Fig 1.1 - Enabling the Feature Tag
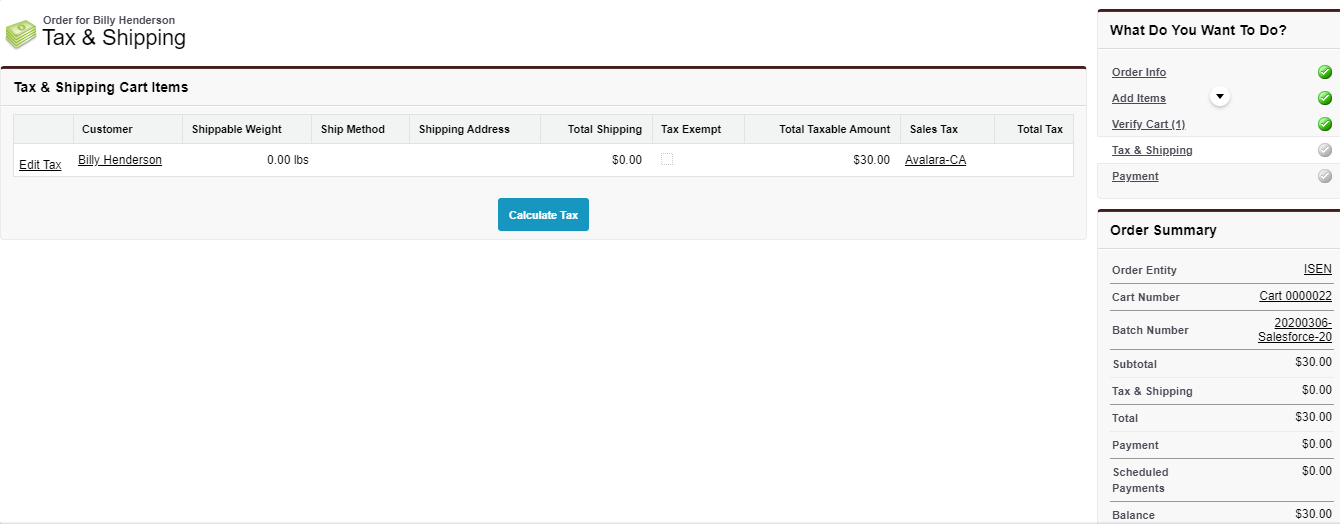
Fig 1.2 - Calculate Tax button in Order Processor
Configuration Steps
After completing the Enablement steps, you will need to configure Nimble AMS so that it can effectively use a third-party tax service to calculate taxes wherever needed.
Please follow the steps below to configure Nimble AMS to work with Avalara AvaTax.
Nimble AMS Advanced Taxation functionality is designed to work with any third-party tax service. The stock implementation is with Avalara AvaTax but you can develop integration with other third-party tax service to replace Avalara AvaTax.
1. Create an Avalara AvaTax Account
An Account should be created with Avalara by subscribing to their product - Avalara AvaTax which is integrated with Nimble AMS to perform tax calculations. You can browse through a number of plans for Avalara AvaTax and subscribe to one which is best suited for your business. For testing and trial purposes, you can also sign up for a free trial. To create a free trial account, follow the below steps:
-
Go to Signup page.
-
Enter your details on that page and click Continue.
-
Enter company details and click Next.
-
Select the API to be used.
-
Set your password using the email sent by Avalara.
Please reach out to Avalara directly if you have questions on their software.
Your trial account should now be set up. Using this account, you can test if Avalara suits your needs. The free trial is valid for 60 days, and you can later convert or upgrade it to a production account. You will probably be contacted by Avalara Sales representative to finalize the sale and pricing for your plan.
2. Configure Page Layouts
We have added some fields which will be required to configure, manage, and use the functionality. Please add these fields to respective page layouts.
-
Entity page layout with the four new Ship From address fields - Ship from City, Ship from State, Ship from Country, Ship from Street.
-
Ship Method page layout with Tax Code and Is Taxable field.
-
Product page layout with Tax code field and Taxable checkbox.
-
Sales Tax record page layout with Status field.
-
Order page layout with External Tax ID field.
-
Order page layout with External Tax Transaction Status field.
3. Configure the Entity
You must configure the entity or entities in Nimble AMS, with a Short Name and Ship From Address. This information will be sent to the external tax service for calculating the tax accurately.
-
Open Entity record in Nimble AMS and make sure that Short Name and Ship From Address are added/available for all the entities that you want to set up in Avalara for tax calculation
-
Ship From Address on an entity is used to help calculate the tax accurately.
-
For Events, Nimble AMS uses the Event’s location address as the single address to calculate tax as opposed to using ship to and ship from address.
-
For Events conducted remotely like Webinars, Organization can leave the Event Location address blank and system will use Entity's Ship From Address for tax calculation.
-
For other products, Nimble AMS uses Ship From Address of the entity in conjunction with Shipping or Billing Address as the Ship To Address to calculate the tax.
-
If an Account does not have Shipping Address, the order processor will use Account's Billing Address for tax calculation. If Billing Address is also not provided, an error is displayed to the staff administrator on clicking the Calculate Tax button on the order processor. In CH, user has to enter one of the addresses to complete checkout.
4. Configure Named Credentials
Named Credentials are required for integration of Nimble AMS with Avalara, as Avalara is a third party system. You need to edit the default Named Credentials to add details of your Avalara Account.
To edit the Named Credentials, follow the below steps:
-
From Setup, enter
Named Credentialsin the Quick Find box, then selectNamed Credentials. -
Edit the Avalara Named Credentials "AvalaraTaxation" and populate or enter the values given below:
-
In Identity Type, ensure that Named Principal is selected.
-
In Authentication protocol, ensure that Password Authentication is selected.
-
In Username, enter the Account ID of your Avalara account. Account ID was set up in 'Step 1 - Create an Avalara AvaTax Account'.
-
In Password, enter the License key of your Avalara account. Avalara documentation to get License Key.
-
To learn more, see Define a Named Credential.
Fig 2.0 - Configuring Named Credentials
In some cases, you will need to enter a different endpoint URL depending on if you are using the staging or sandbox environment of Avalara.
If you are using Avalara Avatax trial account, the URL is https://rest.avatax.com/api/v2.
If you are using Avalara AvaTax sandbox account, the URL is https://sandbox-rest.avatax.com/api/v2.
If you need to enter different Endpoint URL, make sure to create a new Named Credential record with the latest URL, as editing the URL is not allowed on the existing Named Credential record.
Use the newly created Named Credential record while configuring the External Sales Tax record.
5. Configure Sales Tax Record
Nimble AMS Advanced Taxation works with Internal and External Sales Tax records to calculate Sales Taxes. You will need to create an External Sales Tax record for the third-party tax service Avalara AvaTax to perform tax calculations. You can create multiple External Sales tax records as well, to separate the GL entries, if needed. The applicable sales tax (Internal or External) will be auto assigned based on country/jurisdiction of the sales tax record and the shipping address.
To create a new External sales tax record for the third-party tax service, follow the below steps (see Fig 1.3 for a visual demonstration):
-
In the tab bar, click


-
Enter Sales Taxes.
-
Click Sales Taxes.
-
Click New.
-
On the pop up, select External and click Next.
-
In Sales Tax Name, enter the name of the sales tax you are creating.
-
In Named Credential, enter the name of the Named Credential. If you have edited the default Named Credential in Step 4 - Configure Named Credentials above then enter the value, otherwise leave the field blank and Nimble AMS will use the default named credential, AvalaraTaxation.
-
In Calculator Class, enter Avatax.AvalaraCallable.
-
In Status, select Active.
-
In Entity, enter the name of the Entity for which you are creating this sales tax.
-
In State, select a state if entering a state tax rate.
-
In Country, enter the name of the Country if you are setting up a country tax rate.
-
In Sales Tax GL Account, enter the name of the GL Account and select GL Account.
GL Account used here should be linked with the Entity used, otherwise an error message will be displayed.
14. No change is required in Tax Rate as Avalara will automatically determine tax rate.
15. Click Save.
To know more, see Sales Taxes.
Fig 3.0 - Setting up Sales Tax
6. Set up and map companies in Avalara Portal
You need to define and map your association's Entities from Nimble AMS to Companies in Avalara portal, so that Avalara can assign tax based on entities. Please follow these steps to set up companies in Avalara and complete mapping:
-
Identify the Entities in Nimble AMS that you want to set up in the Avalara portal.
-
Copy the Short Name of Entity or Entities found in Nimble AMS.
-
Go to the Avalara portal and create companies following the documentation that Avalara provides.
-
Use the Short Name of Entity from Nimble AMS and map that to the Company Code field in the Avalara portal.
-
Repeat the steps for each entity that you want to set up in Avalara tax portal.
If company codes are not set up for some Nimble AMS entities, the tax charged will be assigned to the Default Company listed in the Avalara portal.
Please follow Avalara documentation to learn how to set up the Default Company for your implementation.
7. Map Tax Codes to Item Codes in Avalara Portal
In order for the correct tax to be charged for products being processed in Avalara you will need to map the correct Tax Codes from Nimble AMS to the correct Item Codes in the Avalara portal.
To map tax codes to item codes, follow the steps below:
-
Note the values of the Tax Code field in Product and Shipping Method objects of Nimble AMS.
-
Go to the Avalara website and login to your Association's account.
-
Match the values to the related Item Code in Avalara using the dropdown provided in Avalara under What You Sell.
-
There is also a spreadsheet available on the Avalara portal called "Avalara_Tax_Code_list" which can be used to understand which tax codes must be applied. See the Avalara Select Avalara Tax Codes documentation for more details.
See Adding Tax Codes for a general overview on Tax Codes.
Products and Shipping Methods where tax needs to be charged should be marked as taxable.
For more details, see Product Configuration and Ship Methods.
If all the steps have been followed you should now have Advanced Taxation feature calculating the taxes (see Fig 1.4 for an example). i.e.
-
Calculate Tax button in Staff View Order Processor (Refer Fig 1.2) should calculate tax using Avalara Avatax service whenever assigned Sales Tax is of type 'External'.
-
Tax calculation for CH user will be done automatically using Avalara Avatax whenever assigned Sales Tax is of type 'External'.
Please see the diagram below for overall understanding of the data flow that happens between Nimble AMS and Avalara Avatax when using Advanced Taxation feature.
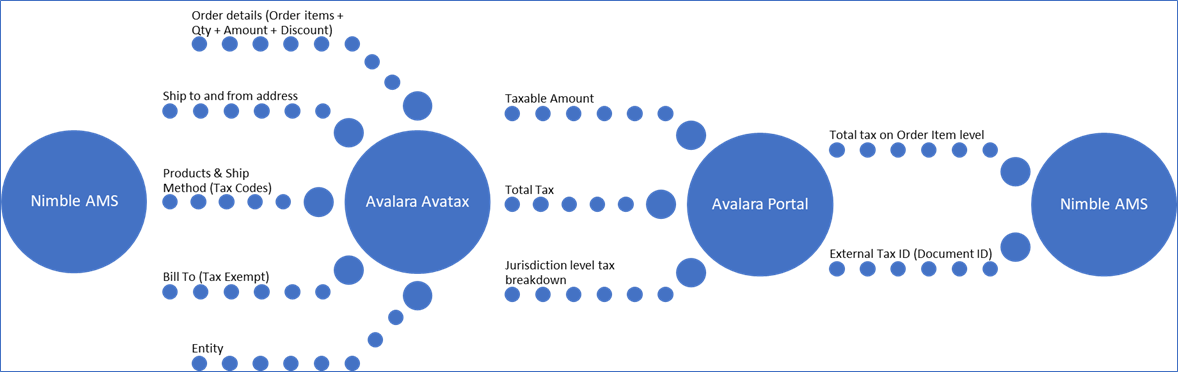
Fig 4.0 - Data flow between Nimble AMS and Avalara (third-party tax service)
Related Links